Introduction
Welcome to CMSI 2120! Your portal into the titillating world of data structures!
Before we get started, some things to note about these course notes and the site you're currently viewing:
You can add notes inside the website so that you can follow along and type as I say stuff! Just hit SHIFT + N and then click on a paragraph to add an editable note area below. NOTE: the notes you add will not persist if you close your browser, so make sure you save it to PDF when you're done taking notes! (see below) Having said that, know that there is a lot of research that suggests taking hand-written notes to be far more effective at memory retention than typing them.
The site has been optimized for printing, which includes the notes that you add, above. I've added a print button to the bottom of the site, but really it just calls your printer functionality, which typically includes an option to export to PDF.
The coursenotes listed herein will have much of the lecture content, but not all of it; you are responsible for knowing the material you missed if you are absent from a lecture.
Any time you see a blue box with an information symbol (), this tidbit is a definition, factoid, or just something I want to draw your attention to; typically these will help you with the conceptual portions of the homework assignments.
Any time you see an orange box with a cog symbol (), this tidbit is a useful tool in your programming arsenal; typically these will help you with the concrete portions of your homework assignments.
Any time you see a red box with a warning symbol (), this tidbit is a warning for a common pitfall; typically these will help you with debugging or avoiding mistakes in your code.
Any time you see a teal box with a bullhorn symbol (), this tidbit provides some intuition or analogy that I think provides an easier interpretation of some of the more dense technical material.
Any time you see a yellow question box on the site, you can click on it...
...to reveal the answer! Well done!
Here's an example box that usually contains an answer!
For those of you viewing from home, at this point we'll review the class syllabus, located here:
Java & Python - A Brief Juxtaposition
Most of you (the audience) will be coming straight out of CMSI 185/1010, so let's start by highlighting the biggest differences between what you've already seen and what you're going to in this course.
Why Java?
The first question people typically ask when they hear it in this course!
Practice with an Enterprise Language: Java is used in many business settings and applications, so having experience with it can open many future doors!
Good Medium for Software Engineering Principles: Concepts such as organizing a code base, collaborating in a team setting, practicing test-driven development, and many others are well enabled by Java.
The Alternatives Aren't Great: C++ is a common alternative but is a bit of a lower-level language (i.e., closer to the memory / hardware, plus you see C++ later in the curriculum), and you've already seen Python, so time for a change of pace!
Let's now take a peek at the biggest differences between Java and Python before we see some examples.
Compilation vs. Interpretation
Explain what it means for Java to be a compiled language, but Python to be an interpreted one.
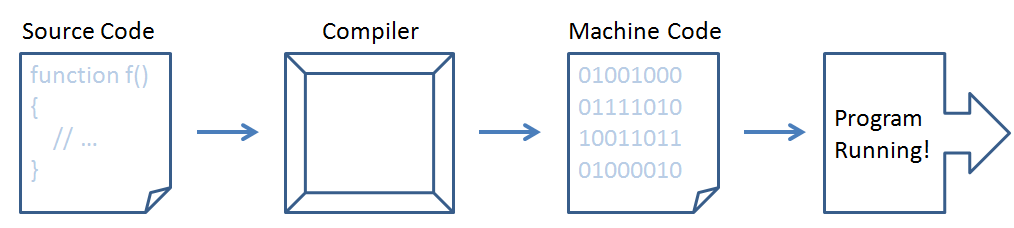
Compiled languages translate human readable source code into machine code, which is then run.
Interpreted languages take either source code files or individual statements (as in an interactive shell), which are then executed by another program that has been written in / can translate to the language of the target machine.
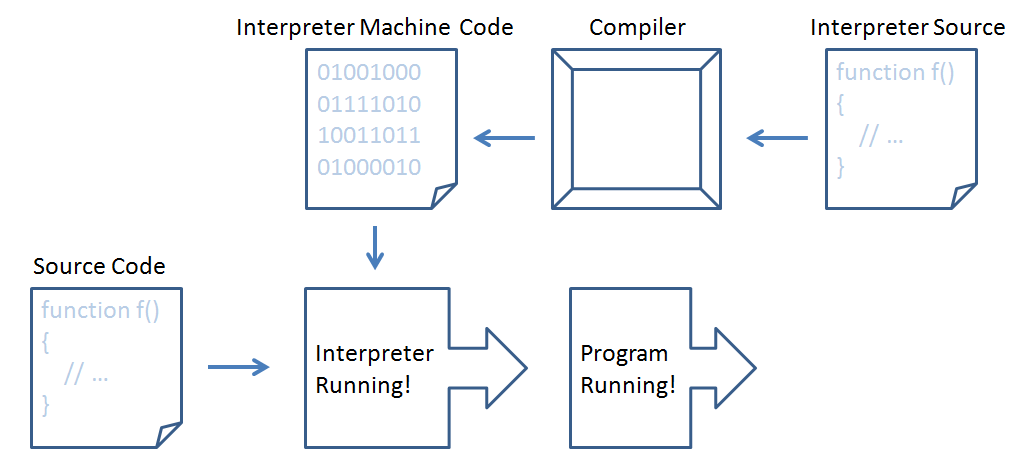
Essentially, unlike Python that has an interactive shell, Jupyter notebooks you can jump around coding in, etc. (features of interpreted languages), Java source code must be completely functional before it's able to even execute a single statement.
Typing
No, not the kind you do on a keyboard...
What is a "data type?" (often referred to as "type" for short)
A classification of data and information with expectations for their properties and behaviors.
For instance, an int is a data type for whole numbers, with expectations to hold numerical values and be amenable to, for instance, arithmetic operations
like + and /. Strings store textual information, and also have a + operator, but this operator has a different expectation!
  # Python
  4 + 4
  => 8
  "cat" + "dog"
  => "catdog"
Here's the biggest difference that you're going to experience between Python and Java:
In Python, types are dynamically inferred, which means they are deduced during runtime without the programmer's specification.
In Java, types are statically manifest, which means they are *explicitly declared* by the programmer before compiling and running.
  # Python (types inferred)
  int_var = 4 + 4
  type(int_var) => <class 'int'>

  str_var = "cat" + "dog"
  type(str_var) => <class 'str'>
  // Java (types manifest)
  int intVar = 4 + 4;

  String strVar = "cat" + "dog";
Some other notes you might've caught from the above:
Recall that variables are used to provide names to values like with
int_varbeing a (not great) name for8.In Python, variables are written in snake-case with underscores separating words like
int_var, but in Java, they are written in camel-case (because of the humps heh) with the first letter lower-case, and first-letters of subsequent words in the variable name as upper-case.In Python, single line comments begin with a
#, and in Java they begin with//In Java, every statement (a basic unit of execution like assigning a value to a variable) must end with a semicolon
;
Well crap, declaring types looks like a huge pain in the ass, why do we bother?
What are some benefits of manually declaring types that offset the extra work placed on the programmer?
Better error detection: type clashes in dynamically typed languages may be permissible when they weren't intended
Better documentation and usage transparency: functions with inferred parameter types can be more difficult to use without proper documentation, and more error prone
Better compilation and run time: inferring types takes computational power that is freed when types are declared; easier compile-time optimization.
Disclaimer: most modern languages have neither 100% statically-manifest or dynamically-inferred typing (some aspects of each), though you'll find that the bulk of your coding will exploit one or the other in a particular language.
For example, Java recently introduced the auto keyword to infer declared variable types -- largely, its use is discouraged because of the loss of efficiency and clarity
that manifest typing in Java brings (put differently: why use Java if you're not using it for its perks?)
Note: Although Java is this course's language of choice, the lessons you'll learn permeate almost every programming language!
So what the heck are we using Java to learn anyways?...
Data Structures
So by now, we should all be intimately familiar with different data types (similar between Python and Java), so we should consider instead what this course is about.
A data structure is a concrete implementation of a data type. Whereas a data type specifies what properties and behaviors can be expected from a particular object, a data structure describes how they are specified, stored, executed, etc.
Analogy:
Data Types : Data Structures :: Using A Calculator : Creating a Calculator's Circuitry
The primary difference: you don't necessarily need to know how a calculator is implemented to use it... but you will to build one!
The same is true for the distinction between data types and data structures; in this class, you will understand how to be an effective calculator builder... or something like that.
This class will focus primarily on the design, use-cases, and analyses of various data types, and how to best implement them in a data structure.
Why take this class?
An excellent question apart from being forced to in the CMSI curriculum!
I. It will make you a better, more efficient, and more organized programmer (and prepare you for internships that often ask related questions from this class!).
To not appear self-aggrandizing, I'll enhance this claim with quotes from others wiser than I:
"Bad programmers worry about the code. Good programmers worry about data structures and their relationships."
- Linus Torvalds (Father of Linux)
(related) "...good data structures make code very easy to design and maintain, whereas the best code can't make up for poor data structures."
- Karl Bielefeldt
[Anecdotal paraphrasing from one of my UCLA mentors] I once consulted for an engineering firm that organized their records so poorly, that within a week, I improved a search operation that previously took 2 days and made it take seconds.
- David Smallberg
"Taking this course will set you above your self-educated peers, because you have to know about a hammer before you even know to use it."(OK so I'm a little self-aggrandizing)
- Andrew Forney.
II. You need to choose the right tool for the right job, and making that determination sometimes requires you to look "under the hood" and be able to analyze what you look at.
Put differently: There's a difference between just getting something to work, and getting it to work *well.*
This is one of the biggest differences between self-taught and college-educated programmers.
In computer science, choosing the *wrong* tool can lead to efficiency problems, messy/uninterpretable code, and poor scalability.
III. Fluency in data structures has recently led to some of the more impressive developments in several computing subfields.
To name a couple:
In artificial intelligence, the popularity of the artificial neural network (a type of DS) has made waves in the subfield of deep learning.
In security, block chain (a type of DS) has seen a good amount of motion for decentralizing data and created a new paradigm of encryption.
So, stick around and you'll learn a lot -- this class is one of the more monumental in your evolution as a computer scientist, and succeeding herein will pave a path directly into your future!
Basic Java Compilation
Java is a compiled language where programs are run in the Java Virtual Machine (JVM).
The JVM allows any program written in Java to run on any computer equipped with a Java runtime environment.
This means that, unlike Python (which runs from an interpreter), Java code is run on a "spoofed" virtual machine suited to the computer running it.
Why should you care? Because the details of compiling and running a Java program will feel very different than running a Python one.
Let's make sure we're equipped to do so now with some of the basics before we look at development environments that perform more heavy lifting later.
Here's the basic format of compiling and running a Java program:
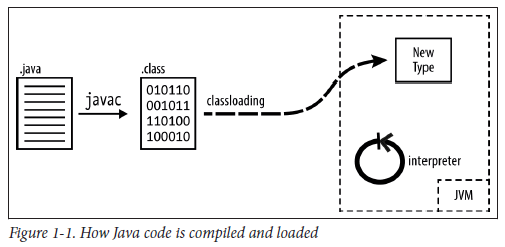
Shamelessly copied from your textbook, Java in a Nutshell.
Source code is human-readable program instruction; in Java, source files end with the .java extension.
Machine code is machine-executable program instruction; in Java, source files are translated (compiled) into machine code to
create .class files, which can then be run in the JVM.
Step 0: Download Preliminaries
To follow the rest of this lecture's tutorials, let's make sure you're all set up with the necessary software.
Make sure you've followed the instructions in the tutorial below before continuing herein:
Step 1: Open your favorite text editor!
You can use anything from Notepad to Textedit to Atom to VIM to Sublime... whatever, this example will be short, and we'll soon pivot to more complex development environments beyond this simple example.
Once open:
Save a new file called
SupWorld.java(Where else to start but the classic "Hello World?" ...but with a cool spin on it 8))Remember where you saved it! You'll need the file path later.
Step 2: Define a Class
Every concrete code we write will be situated in a Java class that shares the name of its .java file.
To declare a class that's publicly accessible to anyone, we use the syntax:
  public class ClassName {

      // ... Class body goes here

  }
In the above:
The
publickeyword is called an access restrictor, which we'll talk about later -- thepublickeyword means the thing we're restricting... isn't restricted at all, but visible and usable by everyone! We'll see other access restrictors that *do* limit access later.The
classkeyword tells the compiler that we're about to declare a new Java class that holds variables, methods, and other data called members.The
ClassNameis a placeholder -- whatever we want to *name* our class goes here (by convention, uses camel-case WITH the first-letter capitalized to distinguish these from other identifiers).
Since our source file is named SupWorld.java, our class *must* be named SupWorld, so let's do that now...
Step 3: Define a Main Method
For most simpler Java programs, execution/running the program begins in what is known as the main method.
The main method has a particular syntax and goes within the class body:
  // Main method signature:
  public static void main (String[] args) {

      // Main method body:
      // Code in here will be executed when run

  }
IOU Explanation: We won't talk about method signatures just yet, so the public static void main (String[] args) part will remain a mystery for now.
This is one of the obnoxious parts of learning Java: a lot has a middle-out explanation, but before we get there, let's just get something to print out.
Step 4: Print Something Out
Just like Python's print(str) method, Java has a (more verbose) tool to print content to the console: System.out.println(str).
So, since we want something to print out when the program runs, we'll add this to our main method:
  public static void main (String[] args) {

      // Prints the String "Sup, World!"
      System.out.println("Sup, World!");

  }
Thus, the full file in SupWorld.java should be something like (without any comments and cleaned-up spacing):
  public class SupWorld {

      public static void main (String[] args) {
          System.out.println("Sup, World!");
      }

  }
Make sure you save the file, it's time to compile and run!
Step 5: Compile the Source
The Java Compiler can be invoked at the terminal/command line via the syntax javac ClassToCompile.java
To do so, you'll need to:
Open either Terminal (Mac/Linux: CMD+Spacebar then search for Terminal) or Command Line (Windows: WINDOWS+R, then type
cmd, and enter).Navigate to the file you saved in Step 1 by using the
cdcommand. For example, if you saved the file on your desktop on a Windows machine, you'd enter:cd C:\Users\yourusername\DesktopType
javac SupWorld.javato compile your code.
If everything went well, you should see a SupWorld.class file in the same directory -- that's the machine code you can now run!
You can try opening SupWorld.class in a text editor, but remember: this is machine code that will not render into the ASCII characters we can read, so will
look like gibberish!
Step 6: Run the Code!
The Java Runtime Environment executable can be invoked at the terminal/command line via the syntax java ClassName.
Note here: When you compiled you used the *file name* with the .java extension; NOW you do not.
So, we'll type: java SupWorld and should see it print "Sup, World!" in response!
[Optional] Step 7: Make an Intentional Mistake
Just to see how things can go wrong, let's forget to put a semicolon after our print statement, and then try to recompile with: javac SupWorld.java
We should see:
  SupWorld.java:4: error: ';' expected
            System.out.println("Sup, World!")
                                             ^
A syntax error is one that prevents successful compilation; all syntax errors must be resolved before a .class file is produced.
If we were to then type java SupWorld in the console, what would happen?
Beware! This is a source of confusion for many beginners! The program appears to run successfully because the *OLD* SupWorld.class (when we didn't have the syntax error) was never overwritten when we failed to compile a second time.
Java is very picky! BUT, note one of the benefits of compiled languages: we learned of our error immediately without the pain of having to discover it potentially later while running!
Java Projects
Now that we have a bit of context for where we're heading, let's dive into some greater specifics.
Because we will be programmatically implementing data types in data structures, it's important we know about good Java project management to be able to handle projects of sufficiently greater scale than SupWorld.
So, let's take a quick detour to set the stage for how larger-scale projects are managed as well as being introduced to the tools to successfully do so.
Java Project Organization
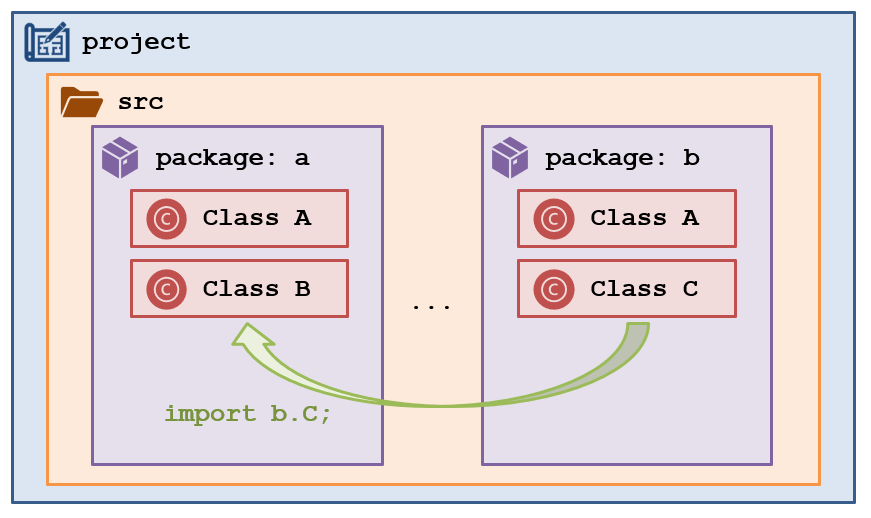
Development of any Java product usually follows a basic hierarchy of organization for the source code that we write:
A Project contains all of the top-level elements including source code, tests, documentation, build configurations, etc.
All source code in a Java project is generally rooted in a top-level folder called src.
Projects are generally local to some development environment (see future section on Development Environments), and organize all of *your* code that is intended for a single purpose / project.
However, since Projects can grow large, we have to be careful to organize its contents or we'd never be able to keep track of everything... for this purpose, we use Packages:
A Package is a grouping of related classes that also give them a shared namespace and special access restrictions.
A Namespace is a grouping of identifiers (names for variables, functions, etc.) in some scope so that names for things can be reused.
Let's build some intuition around namespaces...
How can there be multiple Elm Streets in the world without the post office getting confused?
Consider that there are Elm Streets in multiple cities: in this analogy, cities are like namespaces that allow for us to reuse the
street name "Elm" without there only being 1 Elm Street allowed in the world!
The above intuition also applies for cities in states, etc.
For this reason, packages can also be nested one inside the other, and mimic the encapsulating directory structure of the project.
For instance, a math package might have sub-packages calculus and trigonometry for different groupings of useful functions.
Packages are also named in all-lowercase letters, by convention.
We would indicate these subpackages by a full package name of
math.calculusandmath.trigonometry, respectively.This also means that, within the file system, there is a
mathfolder with subfolderscalculusandtrigonometry.
We then implement the source code (Classes, Interfaces, etc.) within the context of a given package, often utilizing resources from other packages as well.
When we invoke an import statement to use other source code in our own, we are also specifying the package to which a
particular class or set of classes belongs.
  # Python: importing the mean function from statistics
  from statistics import mean

  mean([1, 2, 3])
  => 2
  // Java: importing ArrayList
  import java.util.ArrayList;
         ^ java package
              ^ util sub-package
                   ^ ArrayList class
Using the above, we would be able to create and use any of the contents of the java.util.ArrayList class in our own code!
The ArrayList is one of the first data structures we'll examine in this course... but no spoilers here just yet!
Why do you think we organize our development into packages?
The charm of this organizational structure is that we can develop our own classes which may employ others without having to worry about namespace conflicts (e.g., naming your class and someone else's the same thing), making it easier for us to organize our own projects (logically into modular components), and even making debugging more focused.
With all of that said, let's get set up with a development environment and then practice with these paradigms over the next week or so!
Java Development Environments
Because we'll be dealing with projects that have multiple packages, classes, unit tests, and more, we're not going to want to compile and run via the command line -- that'll take forever and can be error-prone!
As such, for this course, you'll be using a fancy new tool known as an Integrated Development Environment:
An Integrated Development Environment (IDE) is a program that bundles many helpers for software development, including: language-specific text editors, compiler warnings, code suggestions, debuggers, unit-test integration, and much more!
Warning: IDEs can be intimidating at the start, but you'll grow to love them as you gain comfort -- they're used all the time in industry, so it's good to get some experience with one now!
Let's spend some time getting you set up with an IDE and then show how your development cycle will look on SupWorld.java situated in a package structure.
IDE Primer
Step 0: Download Preliminaries
This tutorial assumes you've completed all parts of Step 0 in the "Basic Java Compilation" section! Make sure you've done so first.
Step 1: Choosing a development environment.
Complete the "Highly Recommended" setup instructions in the tutorial here:
Step 2: Choose a workspace.
This one's easy: just create some folder on your computer that you will dedicate to your Java source code.
IDEs like VS Code / Eclipse will ask you to choose a workspace location, but you may have to manually create a workspace if you choose other development environments.
For scalable workspaces, you should create subfolders to organize your code. For example, you may have a workspace folder nesting like:
C:\Users\yourprofile\workspace\lmu\cmsi-2120\
Good workspace organization will save you many headaches in the future!
Note: because we are using GitHub Classroom for the assignments in this course, you will have one top-level Project folder *per assignment* in your workspace.
So, for example, you might accept the first assignment from Classroom and place it in the folder:
C:\Users\yourprofile\workspace\lmu\cmsi-2120\classwork-1-forns\
Step 3: Create a new Java Project
Warning: This step varies from IDE to IDE.
In Eclipse:
In the Project/Package Explorer panel, right click anywhere and then select
New > Java ProjectYou'll be greeted with a dialogue box; simply give the project a name like
java-sandbox, then finish.If prompted to create a module / module-info file here, click "Don't Create".
You should see a new Java Project with some subfolders appear in the Project/Package Explorer. Note the special
srcfolder in which all of your code will go.
Step 4: Create a new Package
Let's just make a simple nested package for now, and call it main.sandbox.
Generally, projects under development have a main and a test package wherein all subpackages are mirrored such that everything developed in
main has some associated tests under test. We'll see this later!
In Eclipse:
Right click on your project's
srcfolder, then chooseNew > PackageFor the package name, choose
main.sandbox-- this actually creates 2 packages:main, and then a sub-package inside calledsandbox.
We'll notice that the package is currently grayed out because there's nothing in it! It's just a folder on our file system until we add some code to it.
[Optional] To see how packages are structured on the file system, right click on the src folder and choose Show in > System Explorer. Notice
that they're just folders for which our Java project has been configured to understand as packages!
Step 5: Create a Java Class
We'll reuse our previous example but show how it looks in a Java package:
In Eclipse:
Right click on the
main.sandboxpackage, and chooseNew > Class. Name thisSupWorldlike before.Once it appears in the Project/Package explorer, double click on it to bring up the text editor.
Notice that Eclipse has filled in some parts of the file already including the Class signature and the package declaration at the top (required to work with packages).
Transplant our main method from earlier into the new file; we should have the following at the end:
  package main.sandbox;

  public class SupWorld {

      public static void main(String[] args) {
          System.out.println("Sup, World!");
      }

  }
Step 6: Compile and run!
Here's where all of our meticulous set-up pays off... we don't have to do anything at the command line!
In Eclipse:
Click the file you wish to compile and run in the Project/Package explorer.
Simply click the green Play Button at the top menu bar!
If everything works, we should see the console pop up with our "Sup, World!" message!
[Optional] Remember when we left the semicolon off our hand-compiled version? Try deleting the semicolon again and notice that our IDE alerts us of the syntax error in advance!
And that's it! This is just the tip of the IDE iceburg... we'll see more impressive features later in the class.
You should make sure that you're able to swiftly accomplish the above steps to develop a workflow for yourself.
Version Control & Git
Version control systems help you to manage project checkpoints, collaboration, and backups.
The most popular in our trade is Git and its associated cloud repositories, GitHub.
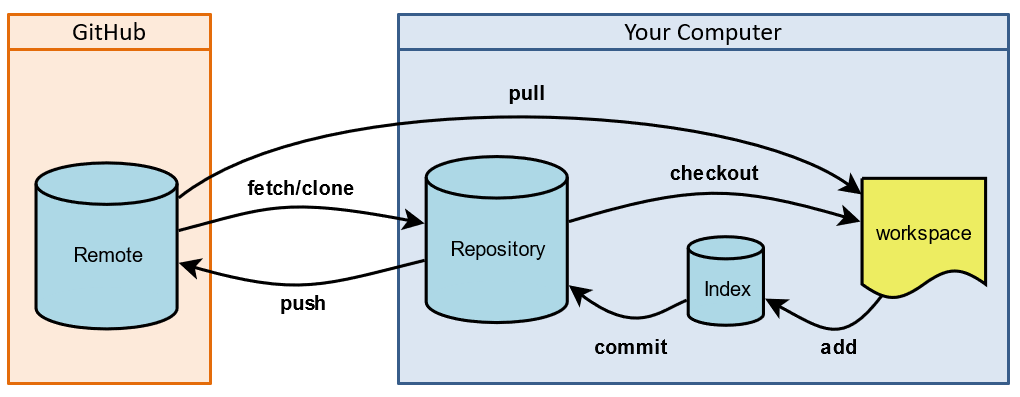
Let's talk a bit about the various locations your code exists, and then the actions that help you manipulate it.
Warning: this is a *very* cursory overview for the tools you'll need for this class -- there are many cool features of Git like branches and merges
that we won't discuss yet.
Git Places
Using Git is a lot like traveling through space and time -- your Project can exist in multiple places and as multiple versions all at the same time!
You can think of the Local Repository as your Project with different versions (commits) every time you make a checkpoint/commit.
Your Workspace is the active version/commit of your repository/Project.
Your Remote Repository is a cloud storage of your Project and its various commits.
We'll be using GitHub as our cloud-storage remote repository manager (it's the industry standard and great to get experience with).
Importantly: your remote and local repositories can have different sets of commits.
Why is it important to have a remote version of your repository?
Several reasons, among others:
It gives you a safe backup for your Projects in case something happens to your computer.
It serves as a central point through which a team can collaborate on the same Project.
The index is a staging ground between your workspace and local repository.
Since commits tend to be reserved for units of change like adding a feature, fixing a bug, etc., you usually do not want to make a new commit/checkpoint until you have a set of changes that should all go at once. That's what the index/stage is for!
So how do all of these versions/commits play nicely together? Let's take a look at the ways we dance around the places above.
Git Actions
The best way to show the actions you perform using Git is through an example -- I'll show you how it works in-class and then you'll have an opportunity to try it out on the first classwork exercise!
Let's see how you'll clone a Java project from a remote repo, make some changes, and then re-commit those!
Step 0: Setup Git Preliminaries
By now I'm sure you have, but make sure you've setup all of the essential preliminaries here:
Note: whenever the tutorial below mentions the "terminal," I'll assume you're using Git Bash on Windows and the system terminal on Macs.
Step 1: Clone a Repository
This will determine where your local repository lives in your computer's file system.
-
Open a terminal and then navigate to wherever you'd like your local repository to be stored. I recommend something like the following:
C:\Users\yourusername\git\lmu-cmsi2120-fall2021
Use the
cd pathcommand to change directories to the parent folder wherein you'd like the repository to live (where "path" is a placeholder for the file path like above; you might type something likecd C:\Users\yourusername\git\lmu-cmsi2120-fall2021). -
Find the GitHub repository that you'd like to clone on your own computer. This will typically be supplied by a Github Classroom link and be available on the green Code button on any GitHub repository page, like the following:
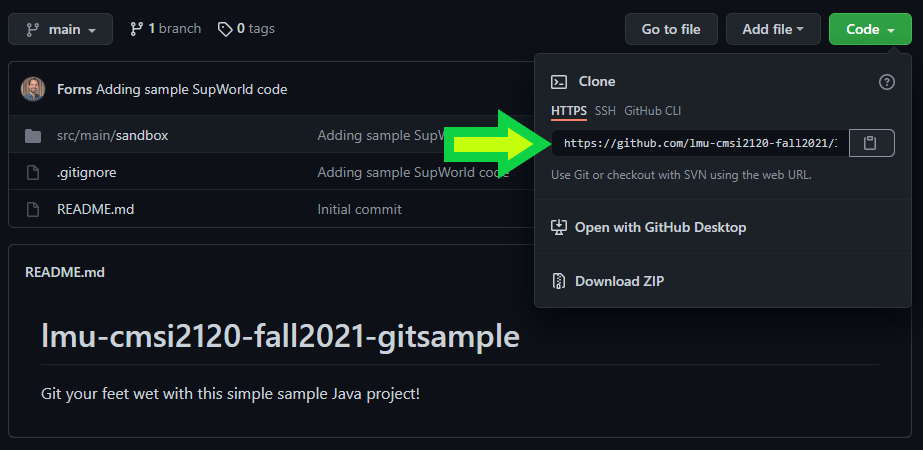
-
Clone the repository through the command
git clone <repo>where<repo>is a placeholder for the link you copied in the previous step. -
If all goes well, you should see some print out like the following:
...and yes my computer is named
FORNTRON-OMEGA
Step 2: Import into your IDE Workspace
Now that we've cloned the remote repository onto our machine, it's time to open it in our IDE of choice! This will correspond with the Workspace place above.
In Eclipse:
Go to
File > Import... > Git > Projects from Git... > Existing Local RepositoryClick the
Addbutton and then navigate to the repository you just cloned in the previous step. Select this repository in the list to continue.-
On the next panel, select
Import Using the New Project Wizard > Java > Java Project.Warning: the next steps are the most commonly missed, read carefully before clicking Finish on the New Java Project dialogue.
-
Enter a Project Name (e.g., if you are working on Classwork 1, you might name it
cmsi2120-classwork1). UNCHECK where it says "Use default location," and instead, supply the directory of your local repository that you cloned it into.
[Optional] this is where you would make any other build configurations like adding JUnit to the build path (which we'll use later, but not in this tutorial).
-
Click Finish to add the Project to your Workspace.
IMPORTANT: If prompted to create some sort of module-info file, choose the Do Not Create option. If you accidentally create it, delete the file with the same name in your project before proceeding, it can cause issues.
Step 3: Do Some Codin'
Alright! Now we can actually work! :sweat_smile:
At this point, the code's in our IDE, the git repository is configured, and we can begin to make changes to the codebase.
Let's make a single change: modify the message that gets printed out in our SupWorld's main method!
Try to run the program again just to make sure everything works.
Step 4: Stage Desired Changes
Suppose we've been working (well, in that last step, not particularly hard...) and have a nice set of changes we want to bundle together into a commit.
Before we save the project's checkpoint as a commit, we first have to stage any changes to the index.
BUT before even that, let's look at a couple of tools for tracking changes that deviate from our repository's current version.
At this point, we've only modified SupWorld.java, so:
Consulting your IDE's project explorer clearly indicates which files have been modified or added; in Eclipse's case, modified directories are highlighted in blue, and files with a prefix
>-
You may also use the
git statuscommand from within your local repository, which will tell you which files have been modified or staged to commit.For example, at this point, we would see:
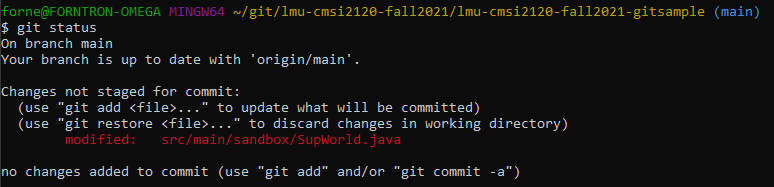
Note in the above that we have modified, but not yet staged, SupWorld.java. To do so, we'll simply:
Use the git add <files> command to stage files that will be bundled into a checkpoint / commit, where <files> is either a path
to a single file, a folder containing multiple files to be staged, or simply a period . to add all modified files to the index.
So, for example, we could type either:
git add ./src/main/sandbox/SupWorld.javaorgit add .to stage SupWorld to the index.Now, type
git statusagain and note that our changes are waiting to be committed!
Step 5: Commit!
Time to make a checkpoint in our repository via a commit!
Use the git commit -m "<commit message>" command to create a checkpoint with all staged files, where "<commit message>" is a
placeholder for an instructive message saying what that commit represents.
For us, we might type something like git commit -m "Changed SupWorld print out for illustrative purposes".
If we don't see anything after that, huzzah! Everything went well, and we've successfully made a checkpoint to our Local Repository.
NOTE: At this point, however, *our computer's* local version of the repository is now ahead of the version on GitHub!
Step 6: Push!
In order to push our local repository's version to the cloud, it's time to synchronize using the push command.
The git push command is used to push local repository changes to the remote GitHub repository.
So, simply typing git push (which *can* be customized with parameters but need not be here), we should see some progress updates in the terminal, and then can check
the associated GitHub repository page and see our changes there!
Step 7: Repeat!
Whew! Thus is the iterative process of software-development and version control! Code a little, make a checkpoint, push, rinse, repeat.
It'll feel a bit verbose at first until you get used to the process, and then, like anything you practice, will become second nature.
As I mention earlier, this brisk tutorial leaves off a lot of the powerful tools that Git provides, but the above is, at minimum, what you'll need to succeed in this class.
[Optional] Pulling Updates
Suppose you are working on a team and another team member makes changes to the repository, pushes those to the remote, and then your local copy is now out of date -- what to do?!
Well, if push comes to shove, then we come to pull!
The git pull command can be used to update the local repository with changes from the remote.
To simulate the team setting for us, we can just do the following:
Go to your repository on github.com
Using their web-editor, change the message in SupWorld.java, and make a commit on the remote directly.
Back on your terminal, execute the
git pullcommand from within the repository.
You should notice that the changes on the remote are now on your local version!
Warning: if you and the remote embark on separate timelines and get out of sync with your development, pulling will force you to execute a merge operation, which is a necessary pain in the butt. If you ever find yourself in such a situation, read this article.
Git Advice
And no, that's not the title of my work-in-progress self-help book for programmers, it's just a few good rules of thumb to help you use Git:
Commit Errorless Code: Never commit code that has errors in it -- if you want to make a checkpoint and save your work with a remote backup, at the very least, comment out code that currently doesn't work so that you may return to it later.
Commit at Regular Intervals: Finish a part of an assignment? Add some tests? Make commits at regular intervals, though not necessarily after every tiny change. This will give you points that you can back-up to if you ever need to regress, and also makes sure you never lose work in the case of disaster (I'm looking at you, laptop-coffee-spillers, the night before the homework is due).
Use Git at the Terminal, not just the Website: this is a technical skill that many internships and hiring companies will ensure that you are proficient with, so best to learn now despite the intimidation surrounding it... and remember to ask questions!
Alright... that's enough listening to, and watching, me by example... time to do some work yourself!
Classwork
Now, give it a shot on your own! See the following Classwork page for info on how to set up your development environment, your GitHub Classroom membership, and other vital parts of the workflow that you'll need moving forward.
Classwork 1