More Notes on Compilation
Before we start talking about File Organization and the process of breaking large projects into constituent bits, it helps to have some greater detail on the compilation process.
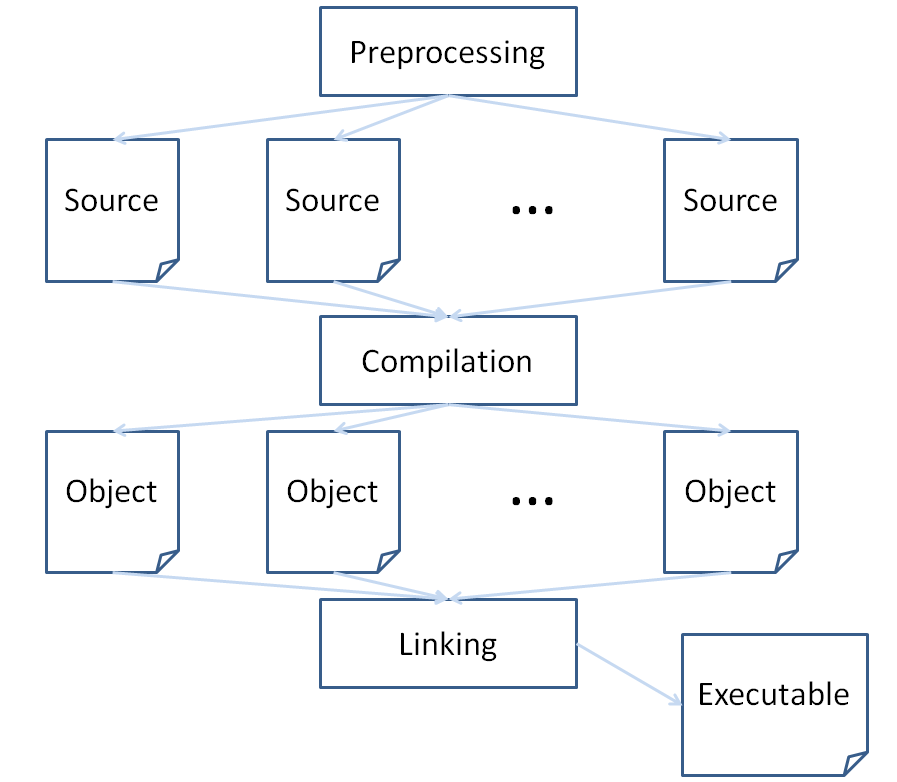
You see, C++ compilation is actually a 3 step process:
Preprocessing
Compilation
Linking
Let's look at what happens at each stage:
Preprocessing
(Note: we didn't go over this yet, but I wanted to fill in a few blanks from lecture)
The preprocessing stage handles what are called "preprocessor directives" like #include and #define.
What we mean by preprocessing is that we are literally doing some file transformations before we begin processing the source into machine code.
For review:
Source code is the human-readable code that we use to create machine-readable instructions through compilation.
Machine code is the machine-executable code that we run during program runtime.
So, what preprocessing does is to prepare the source code for compilation by "replacing" each #include instance with
their respective file contents (or at least the identifiers, to be resolved later).
Lastly, since we haven't really seen it before, the #define directive does the following:
The #define directive says this: give me the name of some identifier, and before compilation, I'll replace it anywhere I see it
in the code with the literal you associate with it.
So, for example:
  #define LOUD_STRING "YELLING"
  #define COOL_INT 42

  int main () {
    cout << LOUD_STRING << endl;
    cout << COOL_INT << endl;
  }
Here, I say, "Before compiling, anywhere you see the identifier LOUD_STRING, replace it with (literally, the text) "YELLING". "... and similarly for the COOL_INT.
So why use #define and not a const variable?
The differences are subtle, but the main difference is that const variables abide by scope rules, whereas #define
values are applied globally.
Because #define is preprocessed, it also means you're not taking up space for another variable, though in practice this isn't a big concern.
Compilation
The compilation stage turns the source code (having been preprocessed) into machine code.
These are binary files that are called object files.
Each source code file will therefore be translated into an object file, with all of its variables, function definitions, etc. now ready to be checked by the linker.
Linking
The Linker takes the object files compiled from source in the previous step and then makes sure that, amongst any of the compiled objects and included libraries, there exists a definition for every function or variable used in the code. If not, then we get a compilation error.
Linkers then assemble all of the dependencies we've listed throughout our source, and creates the executable file, which we run to execute the code (thus the name).
Wow that was dry reading. You still awake? I fell asleep just writing that...
How about some pictures? Everyone likes pictures...
"That's one of your better illustrations, Andrew. I especially like how you ran out of room and had to throw the Executable to the side. Also, I could probably read it from space."
:(
File Organization
So now that we know a little bit about what's going on with multiple-source-file projects, let's actually see how to implement them...
I guess we should start by considering:
Why do we bother breaking down our source into different files? Isn't this just more overhead to learn?
Well, any projects of any appreciable size become ungainly if you have a file that is, say, a million lines of code long! It would be impossible to find anything.
There are also implications for version control and debugging that make breaking projects into multiple files a great idea.
Hey, here's something we haven't talked about before:
A Header File (.h) is just like a .cpp file except that by convention, we use header files to *declare* functions and variables, but .cpp files to *implement* and *use* them.
You can think of header files as contracts between you and the compiler: the headers state what you promise to implement, and the .cpp files are your fulfillment of the contract.
Headers also collect function prototypes so that it's easy to see what the expected behavior of a particular interface will be.
The process of creating header files is typically the following:
Create a new header file; by convention, we usually name it the same as the relevant .cpp file, so for example if I had
Survivor.cpp, I might make a header file calledSurvivor.h(which we'll do in a moment... be patient).Next, we put all of the necessary class definitions, function prototypes, etc. that we deem relevant to wherever that particular header file is to be included.
Finally, we invoke the preprocessor directive by
#include-ing the header file into other files in which it is relevant.
We're used to using includes to get standard library components when we say things like #include <string>.
WARNING: We use the bracketed notation on library inclusions, but the quotation notation for our custom header files. For example:
#include <cctype> // a library include
#include "Survivor.h" // a custom header include
Let's try splitting our Survivor class into a header and .cpp file.
Here's what we had before:
  class Survivor {
      private:
          string m_name;
          bool m_infected;
          int m_health;
          Weapon m_gun;

      public:
          Survivor () {
              m_name = "Rick Grimes";
              m_infected = false;
              m_health = 100;
              m_gun = Weapon("Beretta", 30);
          }

          // Getters
          string getName () {return m_name;}
          bool isInfected () {return m_infected;}
          int getHealth () {return m_health;}
          Weapon getWeapon () {return m_gun;}
  };
Now, we'll make our two files!
Will the following implementation work? Is there something missing?
  // Survivor.h
  #include <string>

  class Survivor {
      private:
          std::string m_name;
          bool m_infected;
          int m_health;
          Weapon m_gun;

      public:
          Survivor ();
          std::string getName ();
          bool isInfected ();
          int getHealth ();
          Weapon getWeapon ();
  };
  // Survivor.cpp
  #include "Survivor.h"
  using namespace std;

  // Initialization list style
  Survivor ():
      m_name("Rick Grimes"),
      m_infected(false),
      m_health(100),
      m_gun(Weapon("Beretta", 30)) {}

  string Survivor::getName () {return m_name;}
  bool Survivor::isInfected () {return m_infected;}
  int Survivor::getHealth () {return m_health;}
  Weapon Survivor::getWeapon () {return m_gun;}
What was missing above that caused an error?
You're so smart... we have a data member of the Weapon class that our compiler doesn't know about any more! We can fix this now...
Let's split our Weapon class into a header and .cpp and see how they all fit together...
  // Weapon.h
  #include <string>

  class Weapon {
      private:
          std::string m_name;
          int m_ammo;

      public:
          Weapon ();
          Weapon (std::string name, int ammo);
          std::string getName ();
          int getAmmo ();
  };
  // Weapon.cpp
  #include "Weapon.h"
  using namespace std;

  Weapon::Weapon ():
      m_name("Colt Python"), m_ammo(6) {}

  Weapon::Weapon (string name, int ammo):
      m_name(name), m_ammo(ammo) {}

  string Weapon::getName () {return m_name;}
  int Weapon::getAmmo () {return m_ammo;}
Now all I have to do is add the Weapon header to my Survivor header and I'm good to go!
I could even execute some test code with a main function in a new file:
  // Survivor.h
  #include <string>
  #include "Weapon.h" // Added!

  class Survivor {
      private:
          std::string m_name;
          bool m_infected;
          int m_health;
          Weapon m_gun;

      public:
          Survivor();
          std::string getName ();
          bool isInfected ();
          int getHealth ();
          Weapon getWeapon ();
  };
  // RunIt.cpp
  #include <iostream>
  #include "Survivor.h"
  using namespace std;

  int main () {
      Survivor s;

      cout << s.getName() << endl;
      cout << s.getWeapon().getName() << endl;
  }
Notice: I don't have to include the Weapon header or .cpp in my RunIt.cpp because it's already been Linked in the Survivor.h.
Neat eh? EH?!
There's one superfluous inclusion directive in my 5-file package listed above. Can you find it?
You don't need to include the string library in Survivor.h any more because it's been included in Weapon.h, which is included by Survivor.h
Summary
Header files used to abstract common components and declarations from the meat of the source and are handy for organizing large projects.
Use header files for class and function declarations, and .cpp files for their implementations and uses.
Your header files should include whatever other files they're dependent upon, that way your .cpps that use the header files don't have to worry about including more than one for a single dependency.
Inclusion Tips & Tricks
Our example so far has had pretty tame and dull uses of the inclusion directive, and a straightforward dependence hierarchy.
LET'S RUIN EVERYTHING.
Say I wanted to add an owner data member to my weapon class that is a pointer to a Survivor, as follows:
  // Weapon.h
  #include <string>

  class Weapon {
      private:
          std::string m_name;
          int m_ammo;
          Survivor* m_owner;

      public:
          Weapon ();
          Weapon (std::string name, int ammo);
          std::string getName ();
          int getAmmo ();
  };
Am I good? Will that compile?
No! Everything's wrong! Our compiler doesn't know what a Survivor is in our Weapon.h class specification.
"Well," you might remark, "Fine then, I'll just include the Survivor header and everything will be fine!"
Will the following code compile?
  // Weapon.h
  #include <string>
  #include "Survivor.h"

  class Weapon {
      private:
          std::string m_name;
          int m_ammo;
          Survivor* m_owner;

      public:
          Weapon ();
          Weapon (std::string name, int ammo);
          std::string getName ();
          int getAmmo ();
  };
Aieee! No, we have what's called a circular dependency because Survivor.h also includes Weapon.h:
A circular dependency exists when we have two or more class definitions that each need something from the other. When we try to include one inside of the other, it creates an infinite loop attempting to resolve the other class!
So, we use a little trick...
A forward declaration can be used to tell the compiler that a certain class exists, even though we do not fully specify its data members, public interface, or full implementation in line with the forward declaration.
So I can tell the compiler that class Survivor exists (and that I promise to give it meaning later, thanks to the Linker!), without providing the whole class definition on the spot, as follows:
  #include <string>

  // Forward declaration!
  class Survivor;

  class Weapon {
      private:
          std::string m_name;
          int m_ammo;
          Survivor* m_owner;

      public:
          Weapon ();
          Weapon (std::string name, int ammo);
          std::string getName ();
          int getAmmo ();
  };
Now, my compiler trusts me that there exists some Survivor class out there while resolving the circular dependency.
WARNING!
You cannot specify an incomplete type (like above) to resolve a circular dependency when the data member needing resolution is an object, rather than a pointer to an object, of the desired class.
If you use a forward declaration with an incomplete type (like above), you cannot reference any of the pointer's public interface elements until the Linker has resolved that other class as well. Typically, this is not an issue if you separate your code into header and .cpp files.
Include Guards
Finally, let's talk about a useful and common practice with header files: include guards.
In large projects with a ton of dependencies flying back and forth trying to be resolved by the compiler, it could be easy to lose track of what you've already included and what you still need to include.
To this end, we have include guards to make sure we avoid the multiple-definition error, which occurs when we accidentally include something twice that attempts to redefine a previously defined identifier.
The include guard directive prevents the multiple-definition error by *only* performing an inclusion if it hasn't already been included. The method for doing this is to say, "If I haven't set a flag yet saying that I've included this, then set that flag and include this."
The syntax for an include guard is as follows:
  // If FLAG_NAME is not defined...
  #ifndef FLAG_NAME

  // ...then define it...
  #define FLAG_NAME
  ...
  // Perform the necessary inclusions
  // and source body definitions here
  ...

  // ...up until you see the endif
  #endif
Let's add include guards to our example headers:
  // Weapon.h
  #ifndef WEAPON_INCLUDE
  #define WEAPON_INCLUDE

  #include <string>

  // Forward declaration!
  class Survivor;

  class Weapon {
      private:
          std::string m_name;
          int m_ammo;
          Survivor* m_owner;

      public:
          Weapon ();
          Weapon (std::string name, int ammo);
          std::string getName ();
          int getAmmo ();
  };

  #endif
  // Survivor.h
  #ifndef SURVIVOR_INCLUDE
  #define SURVIVOR_INCLUDE

  #include "Weapon.h"

  class Survivor {
      private:
          std::string m_name;
          bool m_infected;
          int m_health;
          Weapon m_gun;

      public:
          Survivor();
          std::string getName ();
          bool isInfected ();
          int getHealth ();
          Weapon getWeapon ();
  };

  #endif
Cool... now if, by some accident I included one of my headers twice on accident, I protect myself from having to perform relentless book-keeping.