Assignment 3 - Deep Pac-ets
Before we begin, yes: that assignment title was a pun on "Deep Pockets" because you will be doing deep-learning in the Pacman environment, and be rich with knowledge and experience upon completing it.
This assignment gives you some practice with Deep Q-Learning! Feel free to work in groups up to the group-size limit listed in the syllabus.
In particular, you will get to play around with:
Deep-Q-Networks: both a policy and target network.
Replay Memories and mini-batch sampling.
Reward shaping and integration of the explore vs. exploit dilemma from MAB problems.
Preliminaries
First things first, take some time to read through this article on Deep Mind's discoveries while training DQNs on a variety of old Atari games, though this one focusing on Pacman in particular.
Really interesting, pay particular attention to the Prioritized Experience Replay and "What Does DQN 'See'" sections.
Note that both the DQNs discussed above (and the new and improved PacNet that we'll be using) employ "Convolutional" layers, popularly applied in computer vision to detect things like edges and shapes, but for us will be used to more easily learn features in the Pacman Maze.
If you're interested, you can skim this article on what's happening at a convolutional layer, but deep (pun intended) understanding of these isn't the punchline of this assignment:
[Optional] CNNs with Animations
To analogize why CNNs are useful to us in the Pacman environment, we can rethink our State to look a lot like pixels of an image on a 2D plane, but instead of different channels for colors like RGB, we can have different "channels" pertaining to different maze entities like walls, pellets, and pacman from which higher level features are expected to be learned.
Here's an example "vectorized" format that could be used by a convolutional layer (and is indeed the result of the maze vectorizer I have given you):
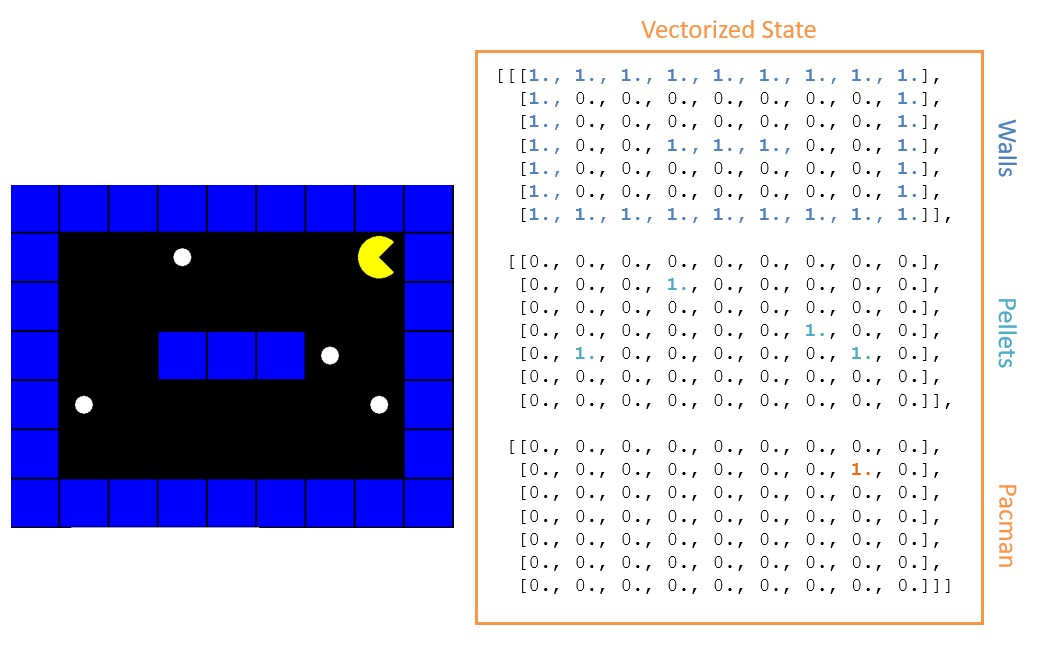
Notice that this representation does not include any ghosts, but if it did, there would be a fourth "channel" with 1s in any grid position containing a ghost.
In all, this makes our "state" a 3-dimensional matrix with dimensions: \([N, R, C]\) where \(N =\) the number of different possible maze entities, \(R =\) the number of rows in the maze, and \(C =\) the number of columns. In the example above: \([3, 7, 9]\)
If we were to add Ghosts to the maze, or want to have a network capable of gracefully handling them later, we would have dimensions \([4, 7, 9]\) since the number of maze entities increased by one.
Now, as for training a DQN, recall that the outputs are Q-value estimates that... actually, never mind, I was just about to retype this entire lecture, which you should review:
The one thing I will repeat is what the training process looks like, and the general pseudocode of what we'll be implementing:
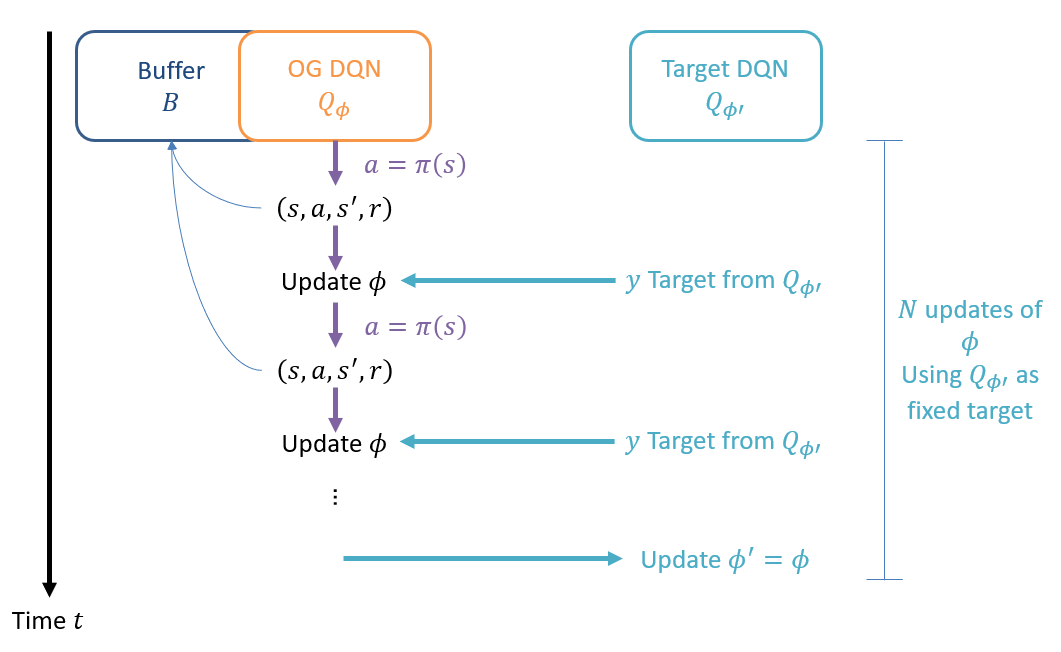
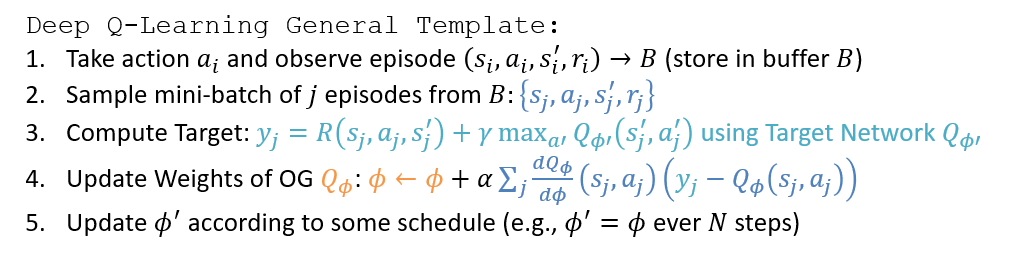
Importantly, notice Step 2 in the pseudocode above, discussing a "mini-batch" of episodes. This is something we saw motivated in that fantastic video by 3blue1brown.
This is especially important as it pertains to how we'll use the Replay Memory Buffer (i.e., to train from a batch of memories at every update to the weights).
Now the good news is that Pytorch has a great tutorial on deep-Q-learning that we'll once more use to scaffold our own agent's approach to learning in the Pacman hellscape.
Although the above articles are great to round out your understanding and highly encouraged to read, the following is required reading and will be referenced throughout the rest of the tutorial.
Got a solid grasp on the fundamentals and the task at hand? Alright, let's jump into it...
You may need to read and re-read this spec a few times and familiarize yourself with the code I have given you in the skeleton before proceeding to the spec!
Solution Skeleton
Start with the solution skeleton in hand! Special thanks to Masao Kitamura for his hard work developing the UI for this training environment.
Included in the above, you'll find all of the modules needed to run the trainer, but the following of which may be of interest in your implementation:
constants.pycontains all of the configuration parameters, including the maze contents, training hyperparameters, etc.environment.pycontains all of the logic for running a single game on the map specified inconstants.py. You shall not change anything in this file (and thus, *should not* need to).reinforcement_trainer.pycontains the logic for training and testing your agent. Includes several items of interest to your learning agent:Episode, a named tuple (basically a map but plays well with PyTorch operations) used to represent a single transition in the environment. Has the format:('state', 'action', 'next_state', 'reward', 'is_terminal')ReplayMemoryclass designed to hold the "short term memory" of the agent's episodes. This will be sampled from in order to perform mini-batch updates to the agent's policy network. Also contains some methods for vectorizing the maze state.PacNetclass extending the Pytorch neural network to form the DQN structure used by your agent's policy and target network.__main__method that executes the training cycle with the parameters specified inconstants.py
You do not need to change any parts of this module unless you'd like to experiment.
pacman_agent.pycontaining all of the logic necessary for training your agent, and then deploying once trained -- it is this file in which you'll do all of your work!pacman_agent_tests.pycontaining all of the checkpoint unit tests to make sure you're on the right track.
By way of dependencies, you'll need:
Pip install the following if you don't have them already
pip install torch tk numpy matplotlibIf you're on a Mac and having issue with tk or it complaining about not finding
tkinter, make sure you have Homebrew and trybrew install python-tk
Note: on the methods you're expected to write, I've done some mypy type hints, but the rest of the skeleton doesn't have these, so don't run mypy and expect to get a clean green.
Specifications

|
GenAI use for the entirety of this assignment is allowed! The main challenge of this assignment will be in fighting obnoxious syntax, less in implementing what you want to happen, which makes GenAI a great tool for the job. |
In this assignment, we'll be training a deep-Q-learning Pacman player to optimally navigate 2 mazes: 1 with and 1 without ghosty bois.
Both mazes are included at the bottom of constants.py, but are repeated herein:
  # Maze 1: Just Pellets
  ["XXXXXXXXX",
  "X..O...PX",
  "X.......X",
  "X..XXXO.X",
  "XO.....OX",
  "X.......X",
  "XXXXXXXXX"]

  # Maze 2: +Ghosty Boi
  ["XXXXXXXXX",
  "X..O...PX",
  "X.......X",
  "X..XXXO.X",
  "XO.....OX",
  "X......GX",
  "XXXXXXXXX"]
Just how difficult the ghosty boi makes things may surprise you...
Although these are the two we'll aim to train on, some smaller, test mazes are included in the unit tests to validate smaller portions of what follows.
Constants.py
First things first, you should take a quick look at constants.py, which contains all of the training options and hyperparameters that you should set in this
one, central location for ease of modification.
  # Simulation constants
  # -------------------------------------------------------------------
  # Number of games to run in reinforcement_trainer.py
  N_SIMS = 8000
  # Max number of moves available to Pacman per game
  MAX_MOVES = 200
  # How long the game will pause between moves. Use 0 for ASAP games
  TICK_LEN = 0 # in ms
  # Random move propensity of ghosts -- higher = easier
  GHOST_EPSILON = 0.1
  # Whether the debug output will print during each game
  DEBUG = False
  # Whether the game will be rendered in the terminal with action choices
  VERBOSE = False
  # Whether the game GUI will launch to show you the game state
  GUI = False
  # Whether or not the models will be training and Pacman taking exploratory
  # moves. When false, takes only greedy moves.
  TRAINING = True

  # Training Constants
  # -------------------------------------------------------------------
  # Number of episodes to sample from the Replay Buffer
  BATCH_SIZE = 32
  # Discount Factor (remember: Gamma = Grandma loves her discounts)
  GAMMA = 0.95
  # Exploration rate for epsilon-greedy agent (can be changed to other ASRs)
  EPS_GREEDY = 0.1
  # Number of episodes between when the target network's weights are set to
  # the policy net's current weights
  TARGET_UPDATE = 100
  # Episode capacity of the ReplayMemory
  MEM_SIZE = 10000
  # Parameters and memory will be saved every time the following amount of games
  # have elapsed; larger number means training progresses faster but can't be interrupted
  # until at least that many games have elapsed without progress being lost
  SAVE_AFTER_N_GAMES = 10
  # Path of weights that will be saved for the policy network when prompted
  PARAM_PATH = "./dat/params.pth"
  # Path to which the ReplayMemory will be saved and loaded when prompted
  MEM_PATH = "./dat/mem.pkl"
Constructor and Attributes
__init__
In your PacmanAgent's constructor (__init__(self, maze: list[str], is_training: bool = Constants.TRAINING, fresh_start: bool = False)), simply initialize any fields relevant to the
training process! The parameters here are the maze on which the agent is expected to perform, a Boolean flag for whether or not this agent is to operate in training mode or not,
and a Boolean for whether or not it should load any previous weights or experiences and pick up from there (respectively).
Tools required for this section come from reinforcement_trainer.py (hint: note their methods):
PacNetReplayMemory
Note: although your agent may play through multiple games of the same maze to learn, your constructor is called exactly ONCE at the start of training,
so any attributes you save here will be initialized just one time, and can be changed in other methods (e.g., see give_transition and give_terminal)
At minimum, you'll need to perform the following:
Initialize the policy network attribute that will estimate Q values.
IF TRAINING (hint: consult parameter), the target network, replay memory, and optimizer attributes must also be initialized.
If already saved, any network weights and past episodes should be loaded into their networks and memories respectively.
Hint: see the ReplayMemory's
load()method and the PacNet'sload(), load_from_pacnet(other_net)methods.Importantly: name the relevant attributes
self.policy_net, self.target_net, self.memory, self.optimizerfor the unit tests to check these!The
mazeparameter is the configuration of the maze that this agent will be expected to perform within, theis_trainingparameter decides whether the agent is currently learning or should act strictly by the optimal policy (hint: you'll probably want to save this as an attribute), and thefresh_startparameter can be set to True if no data from previous episodes should be loaded at the start.
In pseudocode:
  save any constructor parameters as attributes if needed
  initialize Policy PacNet attribute
  if existing PacNet parameters have been saved AND not fresh start:
      load them into the Policy PacNet

  if the agent is training:
      initialize ReplayMemory attribute
      if previous Replay Memory episodes exist AND not fresh start:
          load them into the memory attribute
      initialize Target Network attribute
      copy the Policy Network parameters into Target Network
      initialize the optimizer for the Policy Net (see DQN Tutorial)
You may require additional attributes to be initialized in later methods, which you may also do here.
WARNINGS:
Load any network weights BEFORE initializing the optimizer! Failure to do so will cause your agent to begin learning from an untrained model rather than the one whose weights you're loading!
The initializations in the first part of the Pytorch tutorial code here will help structure this portion (see code up until the choose_action method):
Pytorch Tutorial: Training Initialization
Important difference in our setting: we are not learning from a state that is the raw screen pixels, but rather, one-hot encoded matrices of the maze entities like we had in the Intro to AI Pacman Trainer (which will be easier). As such, ignore the "screen" dimensions stuff, you'll be dealing in nice, clean, binary matrices.
Checkpoint: For each component that follows, you'll find a Checkpoint section that can provide some empirical validation that you're on the right track.
Head on over to the unit tests and at the very least get validation that you set up your attribute *names* correctly, whether or not they've been initialized
correctly! Run pytest -k init to check that the very basics are good to go.
Choosing Actions
choose_action
Time to bring Pacman to life! Implement the choose_action(self, state: MazeProblem, legal_actions: dict[str, list[str]]) -> str method that returns
one of the available legal_actions given the current maze state in state (a MazeProblem that has methods useful for your agent -- take a look at that class!).
Tools required for this section:
PacNetReplayMemory's vectorizers.Pytorch Tensor Tools (See Hints)
-
If training, this is where you'll implement the explore vs. exploit action-selection-rule of your choosing. You may decide to implement something like epsilon-decreasing or epsilon-greedy -- all will work as long as (during training) there is *some* chance to make exploratory moves.
Any constants related to your ASR (e.g., choice of \(\epsilon\)) should be placed in
Constants.py! I left a placeholder there for epsilon-greedy, but don't feel restricted to this. If not training, makes only the greedy moves as decided by the policy network. Remember that the outputs of a DQN are \(Q(s, a)~\forall~a\). Thus, to make a greedy choice, we simply select \(\pi(s) = argmax_a Q(s,a)\).
You can get some inspiration for what's meant to happen here from the Pytorch tutorial's select_action(state) method.
Pytorch Tutorial: select_action(state)
Unlike the Pytorch tutorial, however, we are expected to return the String action corresponding to ["U", "D", "L", "R"].
The other minor quibble is that our network is configured for *batch* training, so we'll need to make this *one* input state match those dimensions with some tricks:
Note that the
vectorize_mazemethod returns a singleFloatTensor.To place this into a one higher-dimensional matrix for batch compatibility, you can use the
unsqueeze(0)(i.e., at dimension 0) method.Now, the state's ready to be input into the Pacnet!
Checkpoint!
You should first verify that you are correctly returning legal actions and can run
pytest -k chooseto validate!Without any training, but with a correctly initialized PacNet, you should be able to inspect the random Q-value outputs from your network at each state that
choose_actionis called upon. Verify that yourchoose_actionreturns the highest of those output activations when you runpython reinforcement_trainer.py.
Shaping Rewards
get_reward
Let's craft our reward function to tell Pacman what he should like or not! Implement the get_reward(self, state: MazeProblem, action: str, next_state: MazeProblem) -> float method
that, given a transition from state to next_state having taken the given action, returns a numerical indicator of its quality.
Tools required for this section:
MazeProblemand its methods such asget_pelletsandget_win_state(note: the parameters are of type MazeProblem).Noting that there are multiple terminal states: winning (collecting all of the pellets), timing out (failing to collect all of the pellets under Constants.MAX_MOVES number of turns), and dying (ghosts gotta eat too meng).
This one is about as simple as you'd expect it to be! Just be wary of the reward magnitudes not being different enough (same) or too big (weight thrashing). Keeping things in the range of [-1, 1] makes everything easier to debug. My advice: start with -1 being death and +1 being victory, and then scale all other rewards in between.
You won't find a lot of help from the Pytorch tutorial here (they did some weird shit with their state and reward representation that you won't); you should only need to use the given state and next state to deduce *what changed* as a result of the chosen action, and then to provide some resulting reward or punishment.
Checkpoint: a few sample transitions have been hard-coded to inspect your rewards in the tests; try running pytest -k reward
to see if you're good! Note: this test simply tests for the essentials of your reward function, though you may well have more to it.
Getting Feedback
give_transition
Implement the give_transition(self, state: MazeProblem, action: str, next_state: MazeProblem, is_terminal: bool) -> None method, which is called by the
Environment after both Pacman and all ghosts have moved. It is parameterized by a transition and whether or not the next_state is a terminal state. Time to do some rememberin'
and learnin'!
Tools required for this section:
Your
get_rewardfunction.The PacmanAgent's
memory, policy_net, target_net, optimizerattributes.The Episode named-tuple in reinforcement_trainer.py.
So it's time to dive deep into Pacman's psyche and conjure some memories to learn from. As mentioned in the intro-articles, this is known as "off-policy" learning, because we are making changes to the policy based on decisions that it may have made long ago, in a past life even!
Still, remember (heh) the utility of the Replay Buffer: to avoid the much more dramatic sounding "catastrophic forgetting" whereby the lessons of past iterations could be lost in future ones.
This method must perform the following:
Firstly, if we're not currently training, do nothing.
Compute the reward associated with the given transition.
Store a memory of it (i.e., a new Episode for the ReplayMemory).
Call the
optimize_model()method to update the policy network.-
If enough steps have elapsed, update the target network by copying the policy network's weights.
Hint: you might need to initialize and then maintain a new attribute of your
PacmanAgentto decide when it's time to update the policy network! You'll likewise find a method of thePacNetclass useful for copying the current policy net's weights into the target net when it's time.
All of these steps have analogs in the Pytorch Tutorial's training loop, though done in slightly different positions and order (look at the second code block in the section below):
Pytorch Tutorial: Training Loop
A companion method to give_transition is give_terminal, which is called when a terminal state is hit, and can be used to periodically
save your policy network's weights and the ReplayMemory's state using its save() method; this method has been provided for you but can be amended as you see fit.
NOTE: the give_terminal method is called *BY THE ENVIRONMENT* when a terminal is reached, so you should NOT call it yourself.
Checkpoint!
You should first verify that you are correctly saving individual episodes using
pytest -k transition.At this point you can verify that Pacman is moving randomly, that it's getting correctly rewarded for events that you've chosen to reward (like eating a pellet), and that these episodes are being stored in the replay memory just by checking its size and sampling its contents. when you run
python reinforcement_trainer.pywith some printouts for what you're curious to inspect ingive_transition.
Model Optimization
optimize_model
With every step, let us hope that Pacman becomes a little less dumb -- here's where we encode that!
Tools required for this section:
PacmanAgent'smemory, policy_net, target_net, optimizerattributesPytorch's Tensor tools, including:
cat, stack, view, unsqueeze, flatten, gather, from_numpyand for debugging,torch.Tensor.size(matrix)to inspect the dimensions of a tensor.
This is where the magic happens... and by magic, I mean madenning juggling of matrix dimensions like trying to untangle that ball of decorative lights around the holidays.
Trigger Warning: you may find yourself flashing back to the days of learning C++ wherein your go-to problem-solving technique for type-clashes involving pointers was just to
indiscriminately add & and * in various combinations until you found one that appeased the compiler.
Anywho, here are the general steps:
Sample a batch of episodes (number of samples specified in
Constants.py).Turn that batch of episodes into batches of their components (e.g., batches of states, batches of rewards, batches of next states, etc.)
Warning: trying to do any of the above using standard iteration will be computationally costly -- use Pytorch's Tensor manipulation methods as specified in the tools section above -- these are optimized and much faster!
Compute the Q-value update that has been sewed into your brain by now (repeated in the Pytorch Tutorial Here and in the Preliminaries section of the spec).
Importantly: remember that the policy-network computes its estimate of \(Q(s,a)\) (the "actual" estimate for the action \(a\) of each episode) and we use the target network to compute \(max_a'~Q(s',a')\). The "target / expected" as we computed in class is thus \(R(s,a,s') + \gamma * max_a'~Q(s',a')\). One wrinkle to this is if the next_state was a terminal, in which case the next-state-action-value \(max_a'~Q(s',a') = 0\) (think: leaf of the expectimax tree).
Feed the "actual" and "expected" Q-value estimates from the above into the chosen Loss function.
Perform a step of back-propagation from that Loss.
The good news: it will look almost exactly like the optimize_model() method in the Pytorch tutorial:
Pytorch Tutorial: optimize_model()
...the bad news, it differs in a couple of respects:
Our state looks different than theirs since we have that \([N, R, C]\) 3-D matrix representing an episode's state and next_state.
Our actions need to be converted to their numerical index representation (see ReplayMemory's
move_vec_to_indexmethod to help) in order to use thegathermethod like the tutorial does.Since our games can end in multiple different terminal states, our episodes record these as a separate Boolean tuple field whereas the Pytorch tutorial represents terminals as
Nonenext-states.The penultimate line regarding clipping can be ignored and is not necessary for our assignment.
Here are some visuals to help you appreciate the task at-hand.
A batch is composed of some Constants.BATCH_SIZE number of samples, which, without loss of generality, we'll say is 32 for this example.
As such, a batch of states has the following format, noting that the "batch" becomes a 4-D matrix that is now \([B, N, R, C]\) for batch-size \(B\).
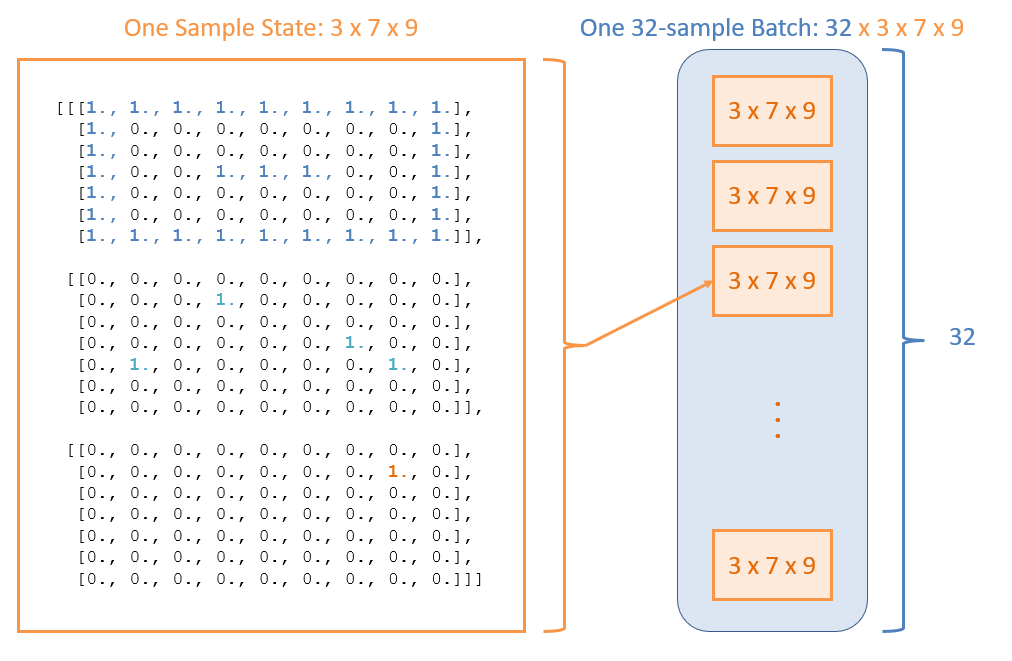
The ultimate goal is to arrive at a batch of actual and expected / target Q-values for the Loss function (like in the tutorial), which
will thus be a \([B, 1]\) 2-D matrix with each element being the actual and expected Q-estimates for each sample from the memory.
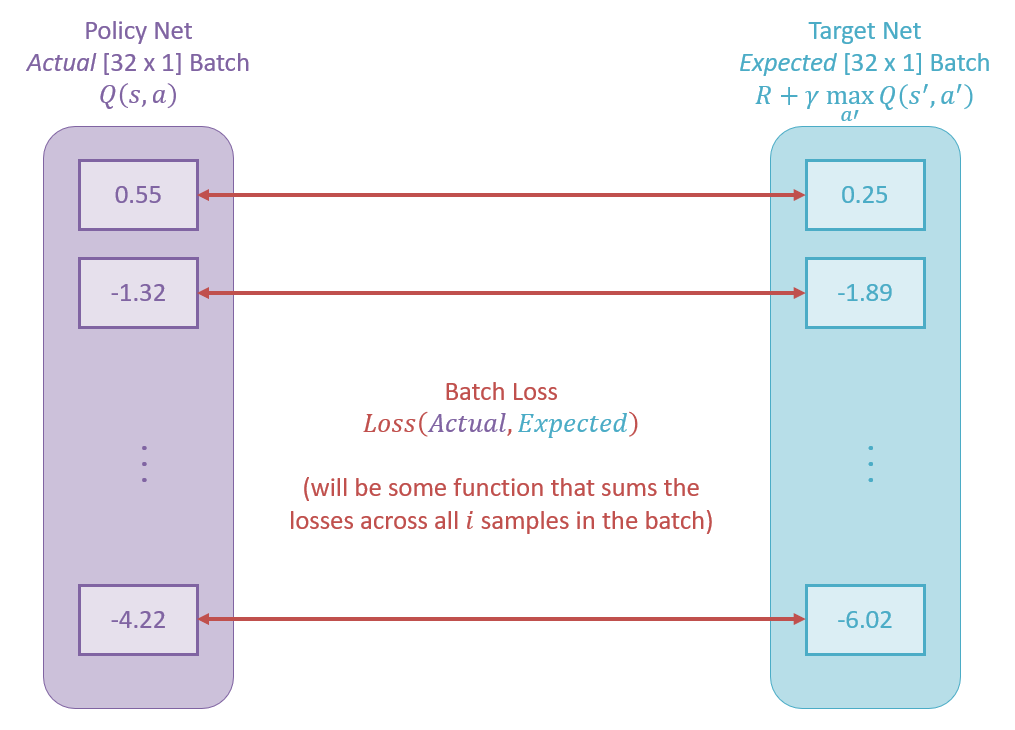
Tracing the components of the tutorial that you'll analogize to this assignment:
Batch of States / Next States: will be a
[B, N, R, C]-dimension tensor of floats where B is the batch size, N is the number of maze entities, and R/C are the rows and columns of the maze. For satisfying the pellets-only maze, this should be[32, 4, 7, 9]if you include all 4 maze entities in Constants.ENTITIES, or[32, 3, 7, 9]if you omit ghosts, but either will work (just keep things as-is in Constants to start)Batch of Actions / Rewards / Terminals: will be
[B, 1]-dimension tensors where B is the batch-size. The data types of these tensors will vary since Actions and Rewards are numerical (Longs and Floats can work) but the Terminals are boolean values, which can also be stored as Byte tensors.Masks for Non-Final Next States: This step is tricky because it requires several steps:
The
non_final_maskshould be a tensor of booleans of dimension[B] = [32]The
non_final_next_statesshould be JUST the batch next states that are not terminals and will be of dimension[X, N, R, C]where X is the number of non-terminals in the batch.The
non_final_valueswill start as a tensor of zeros and then, after applying the mask, should be a[B] = [32]tensor, which you'll need to unsqueeze to make[32, 1]in preparation of the loss function.
Batch Actual / Target Values: will be
[B, 1]-dimension tensors where B is the batch-size in accordance with the image above.
Note the dimensions of the matrices above, this will probably be your chief source of angst and debugging! If you're getting matrix complaints, make sure to
print some_tensor.size() for each of the batch samples to make sure they match those above!
Just as in the 3brown1blue (or is it 3blue1brown? I can never remember...) video, taking a batch loss over a variety of memories allows us to update the weights to generalize across more than just a single experience. A larger batch size typically means that the steps will be more deliberate (i.e., a more accurate representation of the gradient), but the more time it will also take to train.
Checkpoint!
You should first verify that you are updating any weights at all with the optimization test, viz.,
pytest -k optimization.At this point you can visualize the whole thing! Assuming you haven't changed anything in
Constants.py, you can spin up training on the basic maze (with no ghosts) viapython reinforcement_trainer.py
Integration Testing & Fine-Tuning
Testing & Fine-Tuning
Time to run some full-on training and hope that everything has gone to plan! You have two tiers of challenges to now defeat:
Defeat the ghost-less maze in roughly minimal moves:
pytest -k training_basicDefeat the ghosty maze in roughly minimal moves:
pytest -k training_ghostWARNING: The ghost training will take many games to perfect, you may need to leave it running for awhile while you attend to other tasks!
Note: the unit tests above involve running some number of training episodes, after which your training regime should be nearly guaranteed to produce a working
policy. If it appears that you've obtained an optimal policy *before* that upper bound, you may interrupt the training and use the weights that were saved, but beware: the latest
weights will be saved on episode numbers that are factors of Constants.SAVE_AFTER_N_GAMES, which, by default, is set to 10. In other words, if you interrupt training
on iteration 25, the last set of saved weights would have been on iteration 20.
After some test-specific games have completed successfully, you'll see a graph plotting a by-game (X-axis) exponential moving average of three pieces of information, which
have also been saved under the /plots/ directory:
The percentage of times Pacman won.
The percentage of total pellets eaten.
The percentage of max-moves that Pacman took.
These can be useful in seeing how close your agent is to recovering the optimal policy.
Here are 2 sample training results from the two mazes introduced above on which your agent will be tested:
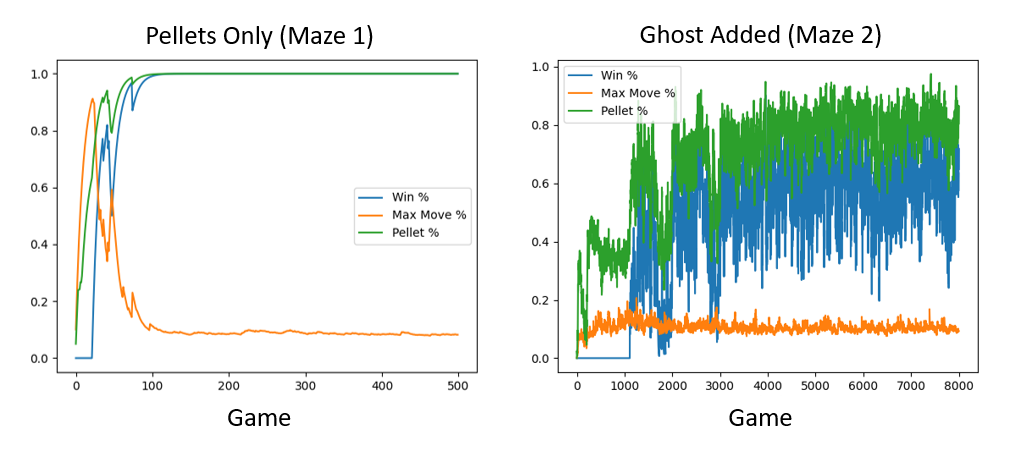
Notes on the above:
This agent used an epsilon-greedy ASR, which explains its erratic win rates in the ghost scenario -- even a single random misstep can cost you your life! It did, however, still recover the optimal policy in this state, even though the graph looks much noisier.
The above graphs represent only a baseline efficacy without a lot of thought put into the reward function or
Note, however, the difference in number of games that were required to train the agent in the pellets-only scenario vs. the ghost addition! There are techniques that can reduce this that we discussed in class (and that were not implemented here, like having an exploration function), but even a small perturbation can lead to a much harder scenario in which to learn!
Sometimes it might look like your agent is getting really bad -- but it may be about to recover! Fluctuations in win percentages are expected, sometimes you have to let it work itself out of a hole. Saving your policy network's weights and ReplayMemory can aid this because you can pick up training where a previous set of sims left off if you were instead to run these scenarios using the
python reinforcement_learner.pyad-hoc training loop.
IMPORTANT: Once the above tests are passing, you'll see the weights saved as /dat/params_test_training_basic.pth and
/dat/params_test_training_ghost.pth. Rename these final, trained weights in the /dat/ subfolder as params_pellets_final.pth for the basic maze
and params_ghosty_final.pth for the ghost maze. THEY MUST BE NAMED EXACTLY THIS TO BE LOADED IN THE FINAL TESTS!
To verify the weights are working as intended, you can run pytest -k deployment_basic and pytest -k deployment_ghost,
which will test each with training turned off.
If you pass the tests above, you're all set! Congrats!
Troubleshooting
...but if things aren't working out after the above, let's think about how we can fix things...
As suggested by one of the articles linked in the intro, it's possible that not enough impactful reward events are being sampled by your batches because they're so rare. You can increase the likelihood of these being sampled by increasing the number of times they are stored in the Replay Buffer.
Tweaking your reward function, experiment with dense vs. sparse rewards, etc.
Experiment with different exploration ASRs or their hyperparameters, e.g., change epsilon for epsilon greedy or try to implement a state-action-specific contextual Thompson Sampler.
As a last resort, try tweaking some of the hyperparameters like a larger batch size, higher target refresh, change the exploration rate, etc.
Customization
Model & Training Customization
Now's your chance to have some fun (as if you haven't already) with some of the advanced techniques covered in class.
In particular, you must implement *at least one* of the following enhancements / experiments to your training loop specified above:
Exploration functions / Intrinsic curiosity modules (i.e., biasing perceived future rewards to favor less explored transitions)
Embodied sensors (i.e., vectorizing the maze as something like raycasts from Pacman rather than every maze entity)
Actor-Critic network configuration (i.e., rather than the traditional DQN approach using a policy and target net)
Other proposal akin to the above that you must get approved by the instructor before starting
Once you have chosen what customization to pursue:
Create new modules / classes prepended by the word "custom" for any files pertaining to your custom technique.
NOTE: Do NOT change any of the files pertaining to the work you completed on the previous problems! Make this custom exploration entirely separate.
For instance, if you were implementing the exploration function as a tweak to the pacman_agent module, you would create a copy of that module called
custom_pacman_agent(and potentially the reinforcement_trainer as well) in which to implement your changes.Before you begin ANY training with your custom enhancements, make sure to rename any plots or weights created in the previous problems to have the "final" suffix to ensure they are not overwritten!
Re-run the training regimen on BOTH mazes from the previous section on your new, enhanced agent.
NOTE: Do NOT overwrite your previously learned weights / graphed plots in satisfaction of the previous problems; make sure to prepend "custom" to the names of any learned weights in this section!
In the file
CUSTOM_README.md, explain:Which of the enhancements you have implemented as well as an explanation of your implementation
Which files / methods to examine to inspect your implementation
How to run your training to replicate your results
At least one graphical comparison of your new version's performance compared to the old (e.g., compare time it took for the agent to obtain maximal reward)
Submission
You will be submitting your assignments through GitHub Classroom!
What
Complete the pacman_agent.py TODOs as left in the skeleton and described in the spec above.
Apart from this deliverable, the /dat/ subfolder should contain two sets of trained weights for your policy network on: params_pellets_final.pth for
maze 1 and params_ghosty_final.pth for maze 2.
How
To clone this assignment (if you need a refresher), consult the guide here:
To submit this assignment:
Simply push your final, submission copy to the GitHub Classroom repository associated with your account.
Place your name at the top of *all* submitted files AND in the accompanying
readmefile.