Assignment 1 - Waiting In Hell
This assignment will get your feet wet with Unity, NavMeshes, and Behavior.
It is divided into two parts based on the lecture materials of the first week:
NavMeshes and Testing
Behavior Graphs
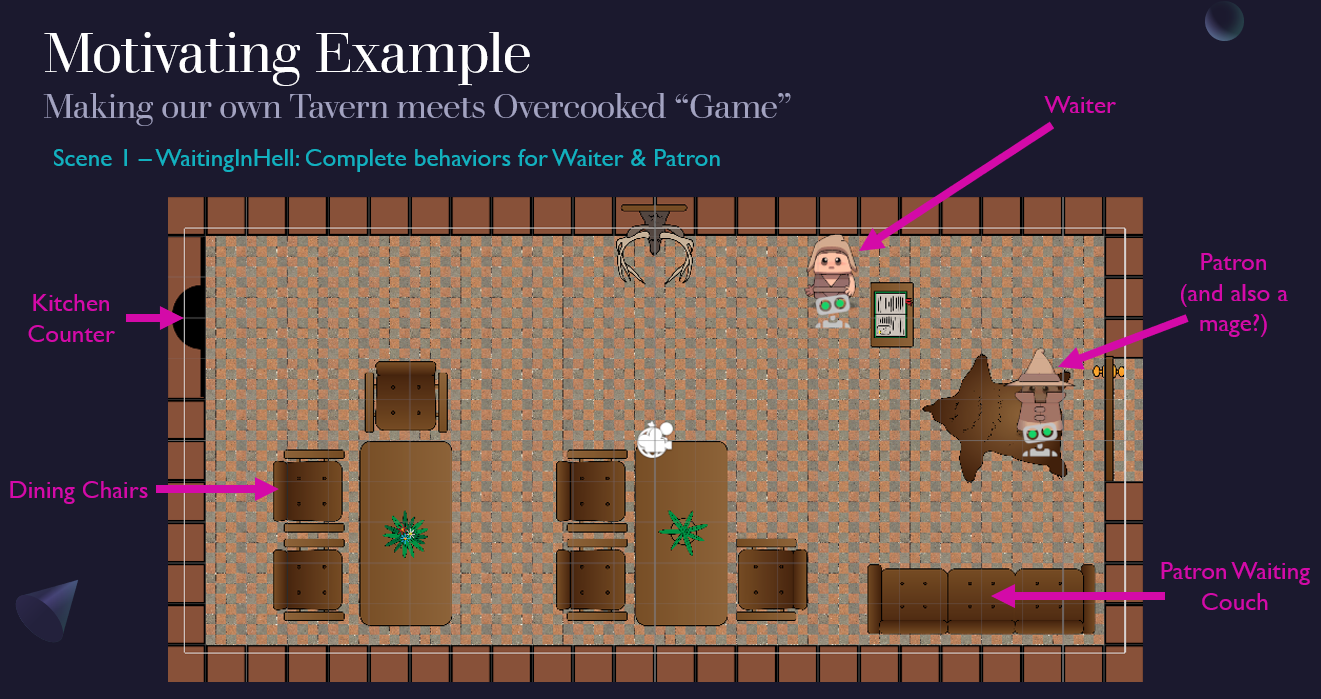
Both take place in the WaitingInHell minigame in which you will simulate the NPC behaviors of a Medieval tavern waiter
and its patrons.
Your Primary Goal: Develop the AI that will control the Waiter and Patron!
As you complete your assignment, you may be asked to make additions to your Report or Recordings, which will be artifacts you generate alongside your programmatic component. These requirements are tagged in purple boxes like this one so don't miss them!
For any written response, you should collect your answers in a single PDF that clearly indicates which answers pertain to which questions from the spec.
For any recorded / video response, you should upload a video to a hosting service like YouTube, Vimeo, Box, etc. and include a link in your report.
Important: for any video resource, ensure that you can access it without being logged into your account before submitting!
Solution Skeleton
Start with the solution skeleton in-hand!
Inside, the important things to pay attention to are:
WaitingInHell/Assets/Scripts/ObstacleCourse/the warmup for Part 1 to get you (re)acquainted with Unity, NavMeshes, and scripting.NavMesh3D/the Unity NavMesh sample scenes to give you some practice with 3D NavMeshes.WaitingInHell/Assets/Scripts/Behavior/the main dish for Part 2 for you to configure the Behavior Graphs associated with the Waiter and Patron.
Once open in the Unity Hub, ensure that you can open the ObstacleMainCourse scene and that all assets are visible.
This project uses the following FREE asset packs (credit to their creators):
Important: Use Unity Version 6000.0.38f1 for this assignment (you should be prompted to download it when loading into your editor).
Part 1 - Meshing with Meshes
In this section, you'll get acquainted with NavMeshes and the Unity Test Framework before moving on to the primary part of the exercise.
Yup, that's right, everyone loves a nice warmup.
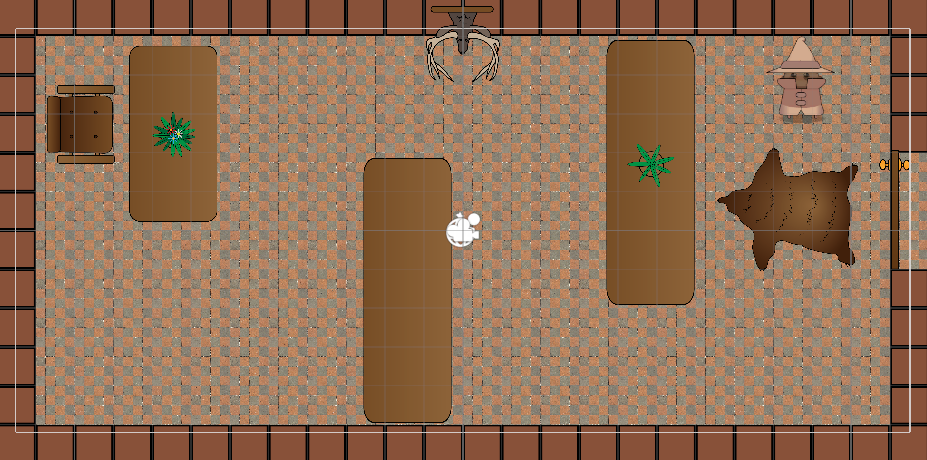
Firstly, open up the ObstacleMainCourse (yes that's a dining play on words) scene and explore its objects.
[Don thy mesh]
Firstly, let's set up the NavMesh for this scene: we want the main restaurant area to be walkable but the dining tables should serve as obstacles.
-
Follow the steps for creating a 2D NavMesh laid out in the lecture, or alternately, you can follow this quick tutorial:
-
Once baked, take a sceenshot of the NavMesh you create and add it to your report for this problem.
(Hint: if you can't see the NavMesh, you can go to your Scene View > AI Navigation > Surfaces > Show NavMesh)
If you have any issues with the above, you can consult the NavMesh in the WaitingInHell scene, which is fully functional.
[Tribute thy patron]
In Assets/Scripts/ObstacleCourse you'll find a ObstaclePatronController.cs that you can attach to the Patron game object and then
use to find and navigate them to the Dining Chair in the scene.
If everything worked as intended with your NavMesh, you should be able to see them lithely avoid the tables and take their seat.
If your agent stutters on edges or has other issues navigating, you likely need to tweak the NavMesh properties and then re-Bake before testing again!
[Feeling testy?]
Now, let's make sure we have a test to verify that our Patron found their seat correctly during gameplay.
Complete the Unity Test Framework (UTF) tutorial in its own project here:
You need only complete the following lessons (but are encouraged to read through more!):
Intro
Running a test in a Unity project
Arrange, Act, Assert
Play Mode Tests
Using the UnityTest attribute
Long-running tests
Scene-based tests
Test cases
Back to our project, and using what you learned above and from the lectures, create a new Play Mode test in the existing Play Mode test assembly under
Assets/Scripts/Tests/PlayModecalledObstacleTeststhat runs your minigame above and verifies that the Patron makes contact with the dining chair.Record your play mode test running and passing, upload the video to a hosting service, and include a public link in your report.
Once passing, put your full test code into your report.
[3D Moggles]
^^^ That's a contemporary term for mogging your friends with your 3D NavMesh experience, you've probably heard of it.
Exit the WaitingInHell project from the skeleton (save any progress) and open the NavMesh3D project!
Included herein are the sample projects for working with Unity's 3D NavMeshes.
Begin by browsing the sample scenes -- there are a lot! Go to
Assets/Samples/AI Navigation/2.0.12/Build And Connect NavMesh Surfaces/Scenesand Play a handful / each to see what unique NavMesh feature is being demonstrated.Don't forget, you can explore the scripts to see each programmatic trick as well! E.g., launch the
2_drop_plankscene, create a plank, and use the hierarchy to inspect the plank's Dynamic Nav Mesh component script!In your report, take a screenshot of the demo you found most interesting and a one-sentence tidbit about what you learned from it.
Finally, open up the
8_height_meshscene and observe the two agents traversing their purgatorial loop in some abstract building with stairs.We're going to give one these agents some hops so they can outpace their neighbor! To do so, we'll create a NavMesh Link described in this tutorial:
Create a NavMesh link for the agent in Building A such that the agent chooses to "jump" rather than use the stairs, like the following:
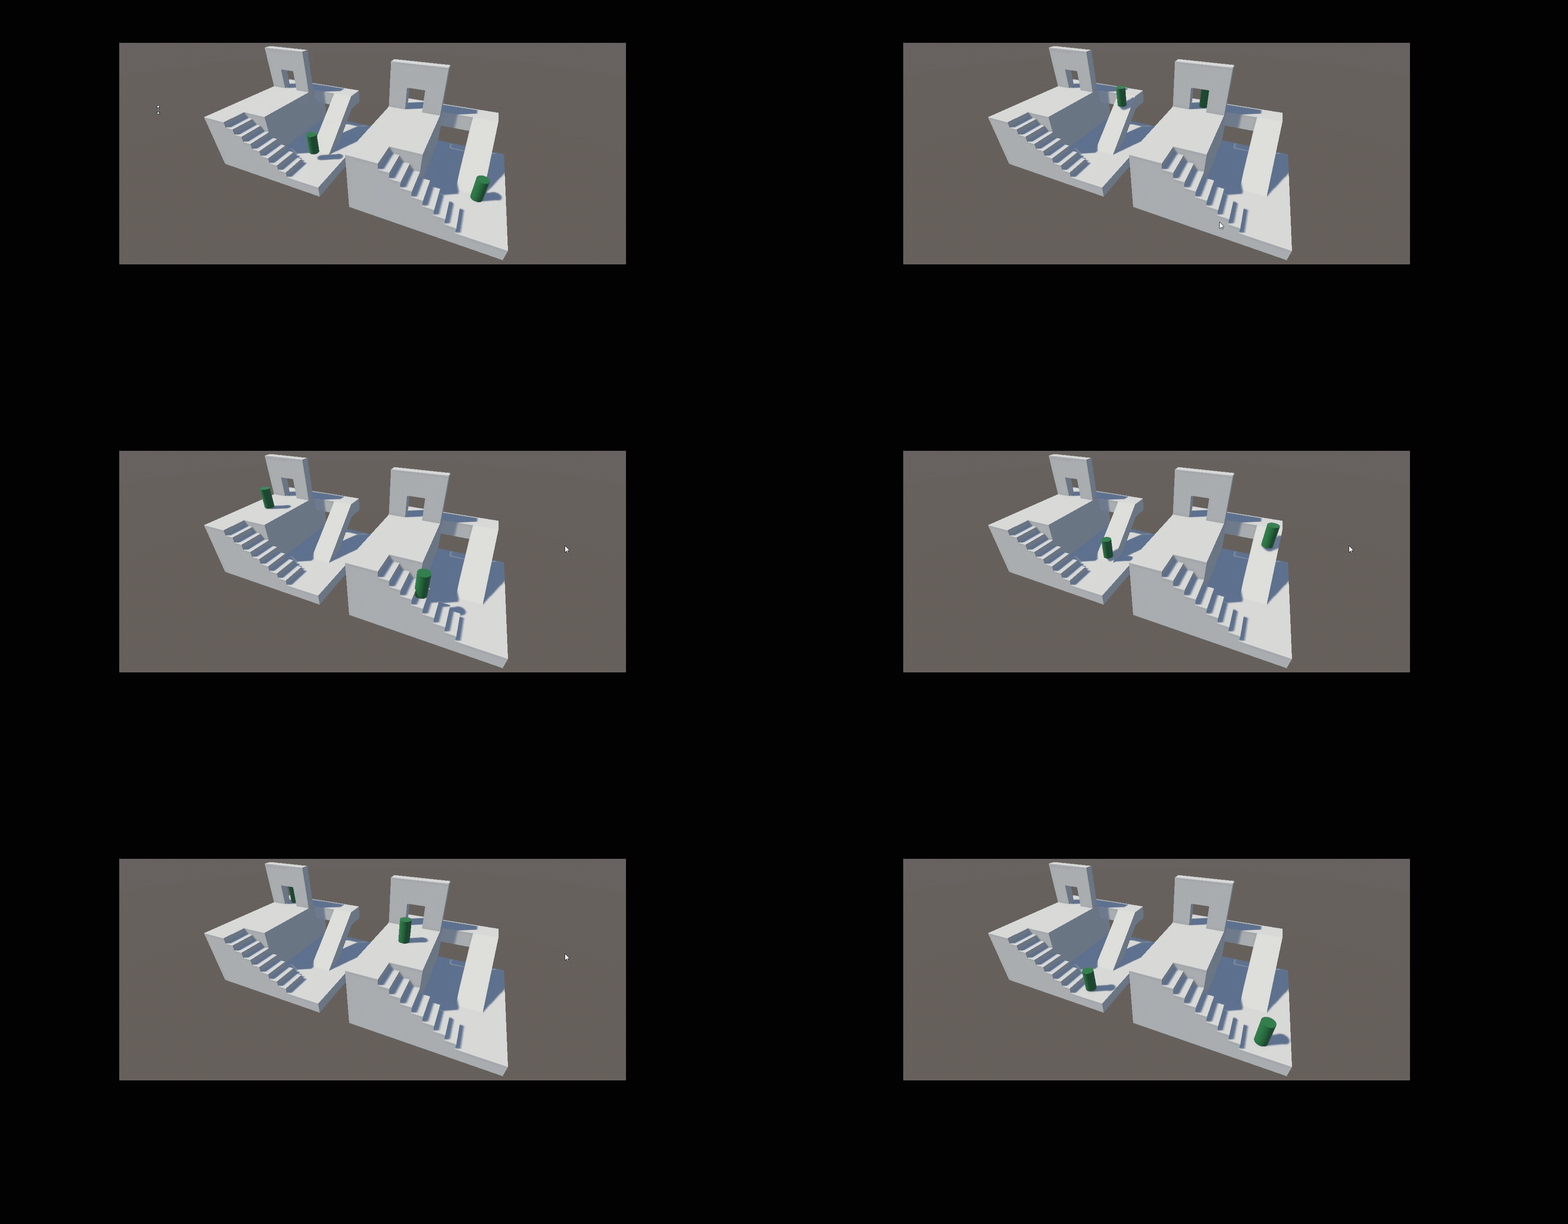
(kudos to Adobe's gif maker for totally nailing the cropping on the above -- can't be bothered to change)
Struggling to get this to work? A few hints:
Take a look at the NavMesh Agent components on the cylinders and who the NavMesh Link is meant to be used by...
Don't forget to bake!
Record your agent taking the jump NavMesh Link in Play Mode, upload the video to a hosting service, and include a public link in your report.
Part 2 - Oh Behave
In this section, you'll get acquainted with Unity's Behavior system for creating intuitive Behavior Graphs.
Head on back over to the WaitingInHell project from the skeleton!
[Perfecting Patrons]
Begin by opening the WaitingInHell scene and running it -- observe what the Patron's current behavior is.
Currently, there's a very dumb implementation of the dining Patron's behavior in Scripts/Behavior/PatronBehavior -- open this Behavior Graph (BG) to see what's up.
The *intended* Patron state behavior is as follows, alongside what you'll need to do:
State |
Desired Behavior |
Needed Changes |
|---|---|---|
Arrived |
Turns out, this state is operating as intended already -- see if you can determine what happens in the arrived state, and then describe it in a couple of sentences in your report. |
Although no changes are *required,* you are free to amend this branch of the BG as needed for the other states. You *should* use this opportunity to acquaint yourself with two pieces:
|
Waiting |
While in a waiting spot on the waiting couch, the Patron should approach the HostStation if the Waiter is in its Idle state AND at the HostStation AND there is a seat available for them. Once the Patron is at the HostStation, they will transition to the Seating state. Important: if multiple Patrons are waiting, only one should be seated at a time. |
Modify the RestaurantManager and associated logic in the Patron's BG to accomplish the above. |
Seating |
The Patron is assigned one of the available seats and moves to it. Upon reaching the seat, changes to the WaitingForFood state. |
Modify the RestaurantManager and associated logic in the Patron's BG to accomplish the above (hint: don't let the Patron pick their own seat like they do now). |
[New!] WaitingForFood |
The Patron waits in their assigned dining seat until the Waiter approaches them in the DeliveringFood state, at which point they will be in the Eating state. |
Create this new State, modify the RestaurantManager as needed, and implement the logic in the BG above. |
Eating |
The patron simply sits for 4-10 seconds of game time before transitioning to the Leaving state. |
- |
Leaving |
The Patron relinquishes their DiningChair, and moves towards the PatronExit (door), and upon reaching it, despawns. |
Make sure any relevant RestaurantManager methods / members you used to reserve seats above are now updated appropriately. |
Once finished with the above, zoom out from your Patron's BG so that the whole thing is in-view, and take a screenshot of your BG to add to your report.
[Wonderful Waiters]
Now it's time to design the most efficient wait staff that Medieval times have ever seen.
The tricky part here: much of the Waiter's state is dependent on the RestaurantManager and Patrons in order to trigger, so you'll need to think carefully about what methods / members are needed to organize the following in concert with the Patron's BG above.
Just to get a feel for some of the important components, open up the
WaiterControllerscript inAssets/Scripts/Behavior/WaiterController.csand explore its methods and members.At present, the Waiter just patrols the DiningChairs, but we'll replace this patrol behavior in its update method with the new BG we'll create below.
Begin by creating a new Behavior Graph in
Assets/Scripts/Behavior/WaiterBehaviorcalledWaiterBehavior.If you need a refresher on how to do this, consult the lecture materials / demo or the unity manual in the following link:
Once created, attach the new Behavior Graph to the Waiter game object in the
WaitingInHellscene.Next, implement the logic for the Waiter's BG as follows:
State |
Desired Behavior |
Needed Changes |
|---|---|---|
Idle |
The Waiter should sit at the HostStation waiting for a Patron to arrive (Note: there is a Note that for any NavMesh navigation in the BG, make sure to use the |
Create this new State in the BG, modify the RestaurantManager as needed (e.g., to somehow expose that the Waiter is in the Idle state), and implement the logic in the BG above. |
Seating |
When a Patron is in the Waiting state and has gotten close to the HostStation, the Waiter should lead them to their assigned seat as assigned by the RestaurantManager. Once the Patron is seated (i.e., in the WaitingForFood state), the Waiter transitions to the TakingOrder state. Beware: you might not be able to have the Waiter navigate directly to the assigned DiningChair because then they and the Patron will be fighting over the seat! Think instead about how to have the Waiter navigate *near* the DiningChair instead for this state. |
Create this new State in the BG (which may require additional variables in the Blackboard), modify the RestaurantManager to track where Patrons are seated, and implement the navigation logic in the BG. |
TakingOrder |
Directly following completion of the Seating state, the Waiter waits for 2-4 seconds to simulate taking their order. After taking the order, the Waiter navigates to the OrderZone as thought they are dropping off the order, and then transitions to DeliveringFood state. |
Create this new State and implement the state transition logic in the BG (hint: you may need to come back to this step in a second to create a Blackboard variable to remember something). |
DeliveringFood |
After waiting 3-5 seconds to "collect" the food at the OrderZone, the Waiter returns to the Patron whose order they just took, then delivers it to the Patron's table. Upon delivery, the Patron transitions to their Eating state and the Waiter returns to Idle. |
Create this new State, implement the multi-step movement sequence, add food preparation timing, and ensure proper state transitions for both Waiter and Patron. Once more, you may need to have this interaction mediated by the RestaurantManager to ensure that the Waiter and Patron are properly paired up. |
Once finished with the above, zoom out from your Waiter's BG so that the whole thing is in-view, and take a screenshot of your BG to add to your report.
[Plentiful Patrons]
Finally, it's time to add a little bustle to the restaurant by adding a few more Patrons!
Although the scene will always begin with the initial FirstPatron game object, you'll need to add a new script to the scene to handle the spawning of additional Patrons.
Create a new script in
Assets/Scripts/BehaviorcalledPatronSpawner.csthat will handle the spawning of new Patrons.In the
WaitingInHellscene, locate the EntryWayDoor game object and attach your new script to it.Implement the logic to spawn new Patrons every 5-8 seconds (randomly chosen within that range).
Hint: you'll want to use the
InvokeRepeatingmethod to spawn new Patrons, see Unity docs here:
Once finished, run the scene and observe the new Patrons entering the restaurant! Make any changes / fixes as needed to make sure that the Waiter and Patrons are behaving as intended in a crowded restaurant.
Once the spawner is functional, add some variety to the Patrons' appearances by having it spawn each with the *same* behavior, but *different* sprites from the sprite pack in the
Assets/Imports/Tasty_Characters...package.Change the length of the Patron's Eating state to 2 MINUTES for the next report recording.
Record a video of your scene running until all DiningChairs and Patron WaitingSpots are occupied and upload it to a hosting service, then include a public link in your report.
[Testing the Waiters]
And yes, that was a play on "Testing the Waters."
Time to add some tests to make sure that everything is working as intended!
Create a new Play Mode test in the existing Play Mode test assembly under
Assets/Scripts/Tests/PlayModecalledWaitingInHellTeststhat runs your minigame above and verifies each part of BOTH the Waiters' and the Patrons' BGs. For example, you should have a test that verifies that the Waiter is Idle when the scene starts, and another that verifies that the FirstPatron eventually transitions to each state in their BG.Create a copy of the WaitingInHell scene, but this time, add 4 Patrons to start. Create a PlayMode test that verifies that 3 of the Patrons are seated, and the 4th leaves.
Record your play mode tests running and passing, upload the video to a hosting service, and include a public link in your report.
Once passing, put your full test code into your report.
Whew! You made it! At this point, you'll probably want to head to your nearest tavern and order some mead (just remember to tip your Waiter!). Remember to submit your assignment via the Submission instructions below!
Grading
Your submission will be graded on successful completion and report on all Problems listed above. Each are weighted equally.
Since some portions leave some room for creativity / interpretation, feel free to reach out if you have questions of whether or not your approach meets the stated spec.
Submission
You will be submitting your assignments through GitHub Classroom!
What
Complete all requested sections of the skeleton above AND finalize your report in a /doc/ subdirectory as shown in the skeleton before
pushing your finished project to your GitHub Classroom repo.
How
To clone this assignment (if you need a refresher), consult the guide here:
To submit this assignment:
Simply push your final, submission copy to the GitHub Classroom repository associated with your account.
Place your name(s) at the top of *all modified* files AND in the accompanying
readmefile.